Reworking the Trigger Pull |
Post Reply 
|
| Author | |
britrifles 
Senior Member 

Joined: February 03 2018 Location: Georgia, USA Status: Offline Points: 8404 |
 Post Options Post Options
") Thanks(0) Thanks(0)
 Quote Reply Quote Reply
 Topic: Reworking the Trigger Pull Topic: Reworking the Trigger PullPosted: September 15 2024 at 10:23am |
|
Took these photo’s using a spare cocking piece to illustrate how I adjust the angle of the surface of the bent.
The second stage trigger pull on my No. 4T was just over 5 lbs. Too high for Vintage Sniper Match shooting with rules that allow a minimum of 2.5 lbs. Had been meaning to do this for a while. I typically set the triggers on my No. 4 rifles to about 4 lbs for the 2nd stage. But I once failed a rifle inspection on my primary No. 4 shooter, our CMP Rules for Vintage Military Rifle (bolt action) allow a 3.5 lb min trigger pull. This is for the Service Rifle category, not Sniper which is 2.5 lbs. I’ve also had the experience of working the cocking piece bent angle too steep one time and loosing the feeling of the 1st stage entirely with about a 2 lb second stage pull. Then had to start all over. So, for the T, I decided to target 4 lbs, a healthy margin over the 2.5 lb minimum. I do this by holding the cocking piece in a small vice such that the sear surface protrudes from the vice jaws by about 1/16 inch. Adjust the angle of the cocking piece in the vice such that the stone sits on the top of the jaws at one end and on the bent face on the other end to get the desired angle on the bent. It’s a bit of a trial and error process. I actually don’t use a stone, I use diamond files in three different grits, Medium, Fine and X-Fine. The X-Fine file leaves a polished surface. I tape the top of the vice jaws and wrap a few turns of tape around the front of the file/stone and apply a little petroleum jelly to the tape so the jaws don’t get filed down and tape easily slides. Works really well and lets you hold the file/stone flat keeping the bent surface flat and square. This took me two attempts. The first attempt did not seem to change the pull weight at all, even though it increased the angle of the bent by about 1 degree. Second attempt brought it to 4 lbs 1 oz. Decided to stop there and shoot it for a while, it may bed in a bit more. I also wonder what practical minimums this type of trigger can be worked down to. You really want the trigger to return to stage “zero” as Shamu call it if you release the trigger from either the Stage 1 or Stage two position. On that 2 lb trigger I did, it would not return to stage 0 when released, it remained in its position which is a dangerous condition. And you need to measure trigger pull weight with the magazine inserted, this increases tension on the sear spring. First photo shows cocking piece in vice with surface of bent just above the jaws of the vice.  Second photo shows position of stone or diamond grit file. I make small strokes of the file, no more than an inch, so that the bent surface does not get rounded. 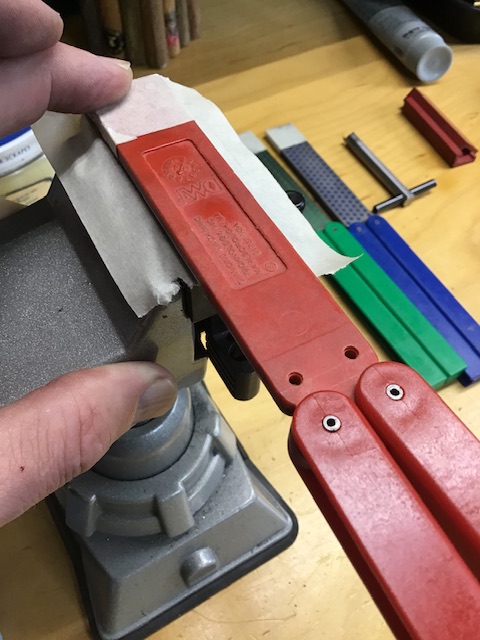 |
|
 |
|
|
DarioPirovano
Senior Member
Joined: May 20 2023 Location: Italy Status: Offline Points: 219 |
Post Options
Thanks(0)
Quote Reply
Posted: September 18 2024 at 8:56am |
|
Good job, here’s what I do with mine and some data I collected by sperimenting and reading around.
Stock untouched NOS cocking pieces surface have a 94° angle, with about 3-3,5kg pull. I start by measuring the surface with a machinist angle finder, and then stone with a 120grit to desired angle, finishing with 480 grit and 1200 grit knifes whetstones. I ruined a lot of triggers and cocking pieces to achieve the perfect trigger pull and I ended up with those figures: Cocking piece sear angle from 98 to MAXIMUM 100° ( do not exceed otherwise it becomes too dangerous ) at 98° with 2,7kg pull and 100° with 2.2kg pull. You got to pay attention to not take off the cocking piece to many times, because the threads will enlarge and when the sear apply force it will have play that can “fool” your trigger pull check, you can fix it by tin soldering the firing pin threads or swage the cocking piece hole with a center punch all around. I also modify the trigger ribs keeping it two stage but making first stage longer, by modifying the top rib shape, with some care to just the trigger alone you can achieve a target rifle crispness break. 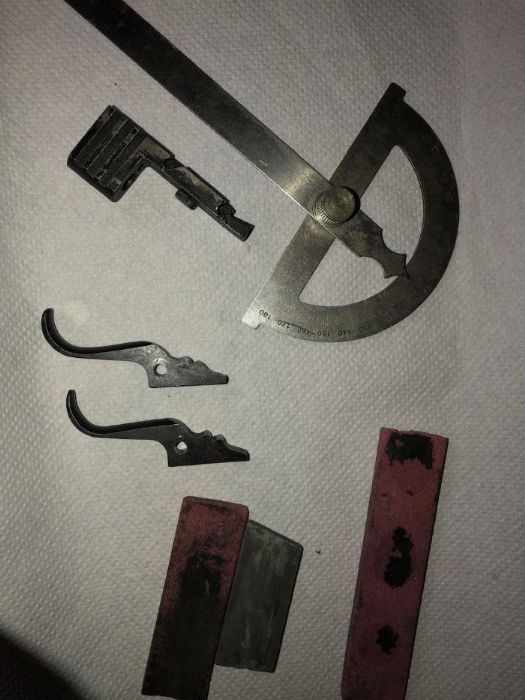 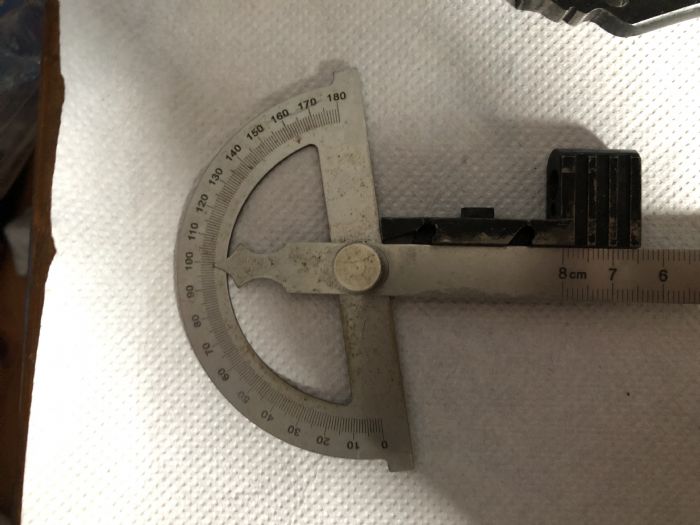 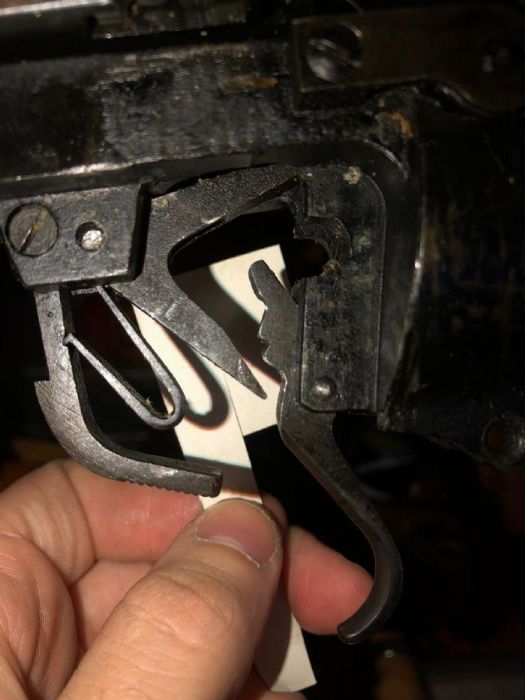
|
|
|
|
|
DarioPirovano
Senior Member
Joined: May 20 2023 Location: Italy Status: Offline Points: 219 |
Post Options
Thanks(0)
Quote Reply
Posted: September 18 2024 at 9:03am |
|
I forgot to mention, always work your trigger before the cocking piece surface angle!
|
|
|
|
|
DarioPirovano
Senior Member
Joined: May 20 2023 Location: Italy Status: Offline Points: 219 |
Post Options
Thanks(0)
Quote Reply
Posted: September 18 2024 at 9:09am |
|
About the trigger not returning to zero position is happened to me too, you need to check the firing pin play inside the cocking piece, if there isn’t any play you need to stone the lower trigger rib by very small amounts, and if it still not resolve, you exceeded the cocking piece maximum angle and you need to install a new one..
|
|
|
|
|
britrifles
Senior Member
Joined: February 03 2018 Location: Georgia, USA Status: Offline Points: 8404 |
Post Options
Thanks(0)
Quote Reply
Posted: September 18 2024 at 9:40am |
|
2.2 Kg is 4.8 lbs. I’ve got mine at just over 4 lbs and functions reliably, plenty of first stage pull. I don’t intend to reduce it any further. I’m measuring this with the rifle held vertically as is done in CMP Match inspections.
I checked two NOS cocking pieces I have, and both are 94 degrees. I should have measured the one I just worked off the No. 4T, but suspect it’s around 97 deg.
We had a member here who supposedly worked his No. 4 triggers down to less than 2 lbs. I don’t know if this is even possible, and I don’t intend to try it. I’d be very worried about an unsafe trigger. I agree with you on minimizing the removal of the cocking piece from the striker. The threads on the T were very tight, especially the last turn or two, no movement between the two parts at all. On some of the other No. 4 bolts, I’ve had to tin the threads on the striker to tighten it up. |
|
|
|
|
Canuck
Special Member 

Donating Member Joined: January 17 2012 Location: Cochrane, AB Status: Offline Points: 4021 |
Post Options
Thanks(0)
Quote Reply
Posted: September 18 2024 at 2:24pm |
|
This is such great information! Thanks for your valuable input, gentlemen!
|
|
|
Castles made of sand slip into the sea.....eventually
|
|
|
|
|
Shamu
Admin Group

Logo Designer / Donating Member Joined: April 25 2007 Location: MD, USA. Status: Offline Points: 20510 |
Post Options
Thanks(0)
Quote Reply
Posted: September 18 2024 at 7:10pm |
|
One thing to be careful about. Those surfaces are case-hardened, don't break through that or you'll just create a "furrow"
|
|
|
Don't shoot till you see the whites of their thighs. (Unofficial motto of the Royal Air Force)
|
|
|
|
|
britrifles
Senior Member
Joined: February 03 2018 Location: Georgia, USA Status: Offline Points: 8404 |
Post Options
Thanks(0)
Quote Reply
Posted: September 19 2024 at 3:21am |
|
Yes, take only the minimum material off that is necessary for the sear to sit on a flat surface, no more. There is no need to stone the entire surface of the bent, the sear typically contacts only the lower half.
This is one part that I find does wear after a lot of use. I’ve had to dress up a few cocking pieces because of wear. But that was after thousands of rounds, perhaps 5,000.
|
|
|
|
|
Zed
Special Member

Donating Member Joined: May 01 2012 Location: France Status: Offline Points: 6460 |
Post Options
Thanks(0)
Quote Reply
Posted: September 19 2024 at 12:46pm |
|
I made a rig for dressing the Cocking piece face. Because it is tricky to ensure surface facing the sear remains parallel.
Regarding the angle; The L39 A1's were modified for Target shooting; so went from 94° to 100°. I have modified my other rifles to around 96°. This gives a decent trigger pull without any safety risks. The risk of removing too much material; can cause a potentially dangerous situation! When pulling the trigger to first stage; the cocking piece slides rearwards slightly as the sear approaches the edge of the cocking piece face for second stage release. If you pull first stage, then decide NOT to take the shot; it is essential that the cocking piece returns to the fully forward position. If it stays in the rearwards position, it can release the shot accidentally if the rifles gets a knock! For the rig; I used two wooden blocks; one for the Arkansas stone. The second has a slot for the Cocking piece. it is a snug fit. There is a small screw at the lower end of the channel; to adjust angle of the CP. It's quite a slow method, but it is accurate.   |
|
|
It's nice to be important, but it's more important to be nice!
|
|
|
|
|
britrifles
Senior Member
Joined: February 03 2018 Location: Georgia, USA Status: Offline Points: 8404 |
Post Options
Thanks(0)
Quote Reply
Posted: September 19 2024 at 1:20pm |
|
Good to see how others have come up with ways to do this. And agree with all the points made by Zed and others.
Addressing trigger pull is a fairly important step towards shooting these rifles competitively. |
|
|
|
|
Shamu
Admin Group
Logo Designer / Donating Member Joined: April 25 2007 Location: MD, USA. Status: Offline Points: 20510 |
Post Options
Thanks(0)
Quote Reply
Posted: September 19 2024 at 2:17pm |
|
One place I use grease is on the front face of the cocking piece. Just a tiny dab. But I've never worn one in all the time I've been shooting. It also smooths the feel of the trigger a bit.
|
|
|
Don't shoot till you see the whites of their thighs. (Unofficial motto of the Royal Air Force)
|
|
|
|
|
britrifles
Senior Member
Joined: February 03 2018 Location: Georgia, USA Status: Offline Points: 8404 |
Post Options
Thanks(0)
Quote Reply
Posted: September 19 2024 at 2:34pm |
|
Yes, as do I Shamu. It takes a lot of rounds to wear it down. In the 8,000 to 10,000 rounds I estimate shot thru my Fulton Long Branch, I did see some wear as you described, a “furrow” on the surface.
|
|
|
|
|
A square 10
Special Member

Donating Member Joined: December 12 2006 Location: MN , USA Status: Online Points: 16999 |
Post Options
Thanks(0)
Quote Reply
Posted: September 25 2024 at 6:29pm |
|
this is a great post , thanks , ive never done this but i think its very valuable data for others wanting to do it ,
|
|
|
|
|
Post Reply
|
|
| Tweet |
| Forum Jump | Forum Permissions You cannot post new topics in this forum You cannot reply to topics in this forum You cannot delete your posts in this forum You cannot edit your posts in this forum You cannot create polls in this forum You cannot vote in polls in this forum |


 Topic Options