No4 MK1
Printed From: Enfield-Rifles.com
Category: Enfields
Forum Name: Enfield Rifles
Forum Description: Anything that has to do with the great Enfield rifles!
URL: http://www.enfield-rifles.com/forum_posts.asp?TID=10728
Printed Date: March 26 2026 at 6:22pm
Software Version: Web Wiz Forums 12.07 - https://www.webwizforums.com
Topic: No4 MK1
Posted By: Jonnybravo
Subject: No4 MK1
Date Posted: July 16 2020 at 10:52am
|
Hi all, Have a new toy that I found in a trash can. Trying to bring it back to life! It’s a M47 / 1943 : No4 MK1. It needs a Complete bolt And magazine. So far I located a NOS bolt for $38 , repo firing pin $17, original bolt head(Complete and used ) $22. One big question I have is what size bolt head to get.(0,1,2,3,)? Also, is an NOS bolt the way to go or just get a used one in very good condition? The rifle was coated in basement storage rust but cleaned up with a good soak in evaporust. If anyone has parts or good place to source parts, let me know. Thanks, Dave ------------- Thanks, Dave |
Replies:
Posted By: Shamu
Date Posted: July 16 2020 at 12:54pm
|
Both the bolt & the bolt head need fitting, they aren't "drop in" parts. The bolt has 2 recoil lugs & they must bear equally on the recesses in the receiver to be safe. There are a couple of tutorials on how to do it on here. https://enfield-rifles.com/lee-enfield-bolt_topic10006_post109412.html?KW=bolt+fitting#109412" rel="nofollow - https://enfield-rifles.com/lee-enfield-bolt_topic10006_post109412.html?KW=bolt+fitting#109412
https://enfield-rifles.com/enfield-headspace_topic10592_page2.html?KW=headspace" rel="nofollow - https://enfield-rifles.com/enfield-headspace_topic10592_page2.html?KW=headspace
There's no "right" head number either. What you're trying to do is have the bolt close fully & lock with both lugs bearing to handle firing stresses & the gap between the front of the bolt head face & the rear of the barrel between 0.067" & 0.074" but longer than 0.064" absolute minimum. You also want the ribs to align but not go past 15° maximum. After all that you then set the firing pin protrusion. Its done last because the other two adjustments will effect it. There are gauges (Headspace gauges) for measuring this, but they are getting scarce. They are called "No Go, Go, & FIELD" but the thickness is the important part rather than the name.
------------- Don't shoot till you see the whites of their thighs. (Unofficial motto of the Royal Air Force) |
Posted By: Jonnybravo
Date Posted: July 16 2020 at 3:02pm
|
thanks for the info on that! Also, is this rifle picky on the ammo brand? Which brand and grain work well in this? ------------- Thanks, Dave |
Posted By: Honkytonk
Date Posted: July 16 2020 at 3:25pm
| In my limited experience shooting several different Lee Enfield rifles, each rifle will tell you what shoots best. Lots and lots of experimenting with brass, powder, and projectiles. I would say start with buying a box of factory 180 and 150 grain Federal (or whatever brand you prefer). Find out what projectile weight your rifle prefers. Once you find that out, stick with that projectile weight, then you will need to start experimenting with different powders, charge weights, etc... or you could kill 40 deer with those two boxes of factory ammo that will both probably produce a grouping with 10" at 100 yards. More than adequate to hunt venison within reasonable range. I didn't count how many rounds you would to shoot to see where the rifle puts these bullets on paper, so let's say you have enough rounds left to kill 25-30 deer. If either round can't produce a pattern within 10" @ 100 yards, the rifle itself has some issues. Best of luck! |
Posted By: Goosic
Date Posted: July 16 2020 at 3:33pm
|
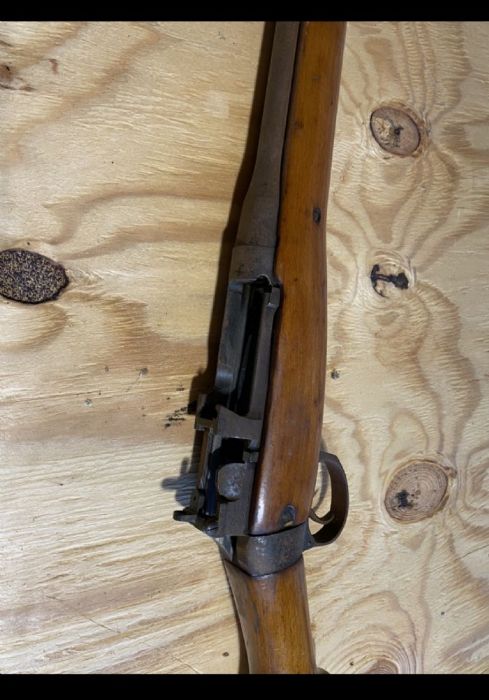
Why was it missing the bolt and what does it actually look like now? Can you supply photos of this trash can find? Before I recommend anything I would like to know the condition of the receiver first and foremost and what the chamber and bore look like. |
Posted By: britrifles
Date Posted: July 16 2020 at 3:35pm
|
Its been many years since I’ve shot factory ammo, and most of that was Mk 7 Service Ammunition (174 grain flat base bullet, 2440 fps MV). Some worn barrels just won’t shoot boat tail bullets. HT is right, try some 150s and 174/180’s and see how they shoot. PPU is supposed to be decent ammo, their cases are certainly good. Reloading gives you many more options. Make sure that rifle is safe to fire first. As Shamu has explained.
|
Posted By: Jonnybravo
Date Posted: July 16 2020 at 4:14pm

------------- Thanks, Dave |
Posted By: Jonnybravo
Date Posted: July 16 2020 at 4:23pm

------------- Thanks, Dave |
Posted By: Jonnybravo
Date Posted: July 16 2020 at 4:25pm
------------- Thanks, Dave |
Posted By: Jonnybravo
Date Posted: July 16 2020 at 4:29pm
|
the bolt and magazine were missing as this was a trash find. The trash cans did not disclose anything further. ;) Also, the barrel grooves are very prominent and nice looking. Even though the outside was rusty(but cleaned up after soaking in evaporust) , the barrel has a lubricant running out of the end. ------------- Thanks, Dave |
Posted By: Jonnybravo
Date Posted: July 16 2020 at 4:33pm
|
the pictures may not show it, but it cleaned up with a nice matte finish. I intend to have it matte blued when I have all the parts together. ------------- Thanks, Dave |
Posted By: Shamu
Date Posted: July 16 2020 at 6:28pm
|
They were never actually blued in service. The standard finish was a hard to find paint called 'Suncorite 151? IIRC" over parkerising. Please tell us you didn't pull the front of the forend down to remove it! That's a bad thing. They're not really picky, but there is ammo & there is rubbish ammo. I'd suggest in no particular order. Privi Partizan 180 & 150 gr. HXP greek surplus (if you can find it) South African A 80 (or 81) RiM3Z I tend to avoid Indian & Pakistani ammo "POF" headstamps is the kiss of death to me. Be suspicious of WW2 surplus. Its storage has been poor & it may be click . . .BANG, or worse click . . . . no Bang! ------------- Don't shoot till you see the whites of their thighs. (Unofficial motto of the Royal Air Force) |
Posted By: Goosic
Date Posted: July 16 2020 at 6:52pm
|
Okay, just to verify. You actually pulled that rifle out of a trash can? I would highly recommend that you take the barrelled receiver to a machine shop and have it magnafluxed to to check for any cracks and if it passes inspection,take the bolt assembly you buy and the barrelled receiver to a competent gunsmith and have the bolt matched to the rifle. I do not like this whole trash can reference in my honest opinion and I am very hesitant on giving out advise that may lead to a catastrophic failure from a trash can find that you are going to just put a bolt back in it after squirting a bunch of rust remover all over it and basically asking for advice as to which grain of bullet should you buy to possibly tear your face off with when the receiver comes apart.
|
Posted By: Honkytonk
Date Posted: July 16 2020 at 7:18pm
| My response was only in regards to the OP'ers question on ammunition choice. Of course, the rifle must be thoroughly checked and bolt fitted by a competent gunsmith, preferably familiar with Lee Enfields. |
Posted By: flatheadsal
Date Posted: July 16 2020 at 7:23pm
Goosic, being from NY myself {Long Island NOT NYC} I find alot of people are "afraid" of firearms, therefore they have no idea how to dispose of a gun maybe left by a deceased relative etc. the easy solution would be to remove any moving parts and dispose of the rifle and any parts in seperate garbage cans, just a theory here as I have purchased many rifles after inquiring at garage sales over the years, and on many occasions have heard from the sellers that they didn't know how to sell or dispose of them. Needless to say I was glad to help them out! Just as a side note since emperor Cuomos SAFE act it is no longer legal to sell or buy a firearm between 2 people ( even family members) in NY without going to an FFL dealer and doing a NICS check. This s a big part of why my wife and I are moving to your beautiful state in September this year, I might just have to get in touch when we get settled. flathead
|
 Goosic wrote:
Posted By: Jonnybravo
Date Posted: July 16 2020 at 7:27pm
|
ok.....so yes it was out of a trash can. I ended going to the house where I got it and asked if they had the bolt and magazine......then got the back story. Apparently the girl that lives at the house with her husband got the gun as a hand me down from the grandfather who was in WWII. Sometime during the grandfathers ownership, he removed the mag and bolt and stored it separately from the gun for safety reasons. But when the grandfather died, nobody knew where the missing items went. So it was handed as-is down to the granddaughter, who stored it in the basement (not knowing anything about guns)and there it sat getting rusty. They were actually glad someone was going to rescue it. As Paul Harvey Would say “now you know the rest of the story” ------------- Thanks, Dave |
Posted By: Goosic
Date Posted: July 16 2020 at 7:51pm
|
Let me know when you arrive. Would be glad to meet and greet. |
Posted By: flatheadsal
Date Posted: July 16 2020 at 7:59pm
| I certainly will, will be about an hour and half north of you, will be nice to meet some gun buddies to hang with. How are the gunshows there? |
Posted By: Goosic
Date Posted: July 16 2020 at 8:13pm
| Crossroads of the West has at least two of them a year here and the turn out is exemplary. |
Posted By: flatheadsal
Date Posted: July 16 2020 at 8:20pm
| good news. Needless to say most of new York's shows are pretty anemic. Talk to you after september. |
Posted By: Goosic
Date Posted: July 16 2020 at 9:24pm
|
Definitely. If you will be living in or near Prescott. Visit J&G Gun Sales.
|
Posted By: tharruff
Date Posted: July 17 2020 at 3:20am
|
Johnnybravo, Can you tell me where you found the bolt heads for sale that you mentioned ? I am also looking for a bolt head for a No 4 Mk 1 rifle...in a size '3' and haven't been able to find a source.
|
Posted By: Jonnybravo
Date Posted: July 17 2020 at 5:39am
?? Not sure I understand. Nothing was forced apart during disassembly. ....and yes , it will be going to a gunsmith before first fire. ------------- Thanks, Dave |
Posted By: Shamu
Date Posted: July 17 2020 at 7:14am
|
It wouldn't need to be to do unintentional damage. There's an area called "The Draws" at the rear ish end of the forestock. Its a critical part of bedding the action to the wood. If you removed the wood by innocently pulling the front away from the wood when removing it you may have accidentally crushed & so damaged them by the lever action involved. The correct way is to tap the REAR end down gently so it separates parallel to the barrel.
------------- Don't shoot till you see the whites of their thighs. (Unofficial motto of the Royal Air Force) |
Posted By: Goosic
Date Posted: July 17 2020 at 8:23am
Numrich Gun Parts in Hurley has pretty much everything you will need to put the rifle back together. Sarco, Dixiegunworks, BDLLTD, and Apex will also have Enfield rifle parts as well.
|
Posted By: Goosic
Date Posted: July 17 2020 at 8:28am
Can you elaborate on why you need a #3 bolt head? Did a knowledgeable gunsmith headspace the rifle with the correct headspace gauge and what is the length of the current bolthead?
|
Posted By: tharruff
Date Posted: July 17 2020 at 9:21am
|
A semi-knowledgeable gunsmith (me) evaluated the head space with a 'Field' gauge. The current both head is a size '0' and measured 0.625 as I recall. I have been down this path twice with two No 1 Mk III rifles. Both were successfully returned to fireable condition. I think that in the case of this No 4 Mk 1 rifle a size '3' bolt head that measures 0.634 to 0.636 will do the job. I currently have a wanted ad for the same. The original poster indicated that he had found size '3' bolt heads for sale...I have thus far been unable to find a size '3'. If he will divulge his source I would like to try and buy one.
|
Posted By: The Armourer
Date Posted: July 17 2020 at 10:14am
I'm sure you realise that specifying a No3 bolt head is pointless - the fact you refer to it as a 'size' 3 is telling. No3 bolt heads can be shorter than No0, No1 or No2 bolt heads. For example a Size 0.632" could be any '#' of bolt head. You need to identify what SIZE (actual dimension) that you need and buy one that is the right SIZE. Buying a No3 bolt head will very likely end in tears. |
Posted By: The Armourer
Date Posted: July 17 2020 at 10:17am
|
Here is a table showing actual bolt head sizes, with the dimensions you are looking for any 'number' could be what you want - it could even be a No0.  |
Posted By: Jonnybravo
Date Posted: July 17 2020 at 10:19am
|
for the size 3 bolt head.....I found one while doing an extensive search online but have since not been able to locate it again.....I believe it was $65. I ended up getting a size zero to start. If I do need a different size head , are the bolt head parts interchangeable? I have a gunslinger that is knowledgeable on the Enfields and will set the headspace for me and potentially do first fire sight it in(if timing works out). ------------- Thanks, Dave |
Posted By: Goosic
Date Posted: July 17 2020 at 11:42am
I was just asking to verify if headspace was checked with a .074" NoGo gauge because the Forster. 070" field gauge will give you a somewhat false reading. The Armourer is correct about bolthead lengths being misconstrued between the numbers. However,you stated that your #0 is .625". Typically the next logical step would be to the next size up. Each number increment should but not always be in .003" increments. Your next bolthead length should be .628-.631. I.have a spare #1 bolthead that is .630" I also have two spare #3 boltheads. One is .638" and the other is .637"...
|
Posted By: The Armourer
Date Posted: July 17 2020 at 11:52am
The following are notes from Peter Laidler on proper use of headspace gauges and bolt head sizes : Now that the gauge is into the chamber and the bolt is being closed, this is where the trouble lies. It’s important here to remember the often said phrase among Armourers of ‘DON’T OVER CHS’. Here’s another thing to remember during this. Because there is a camming action operating while OPENING the bolt, called ‘PRIMARY EXTRACTION’ this action also operates when closing the bolt. And the same primary extraction forces that will enable the infantryman to force the bolt closed and unlock and extract a possibly distorted she!! case, covered in wet silt and mud in the saltwater Magrove swamps of Johore in Malaya that’s caused the case to stick hard to the chamber walls will also enable the butchers or bubbas to close the bolt hard against the gauge. NO-GO on the .074” gauge is when, using the lightest finger and thumb action on the knob causes a slight feel of resistance. The next question you’re going to ask is ‘…where during the bolt closing movement is this slight feel of resistance acceptable --- Is it almost closed or, hardly closed or in between’? Good question and the answer in the bible reads thus: ‘…with a 0, 1 or 2 bolt head, there must be resistance onto the .074” gauge prior to there being a minimum of .050” from the underside of the bolt lever to the contacting point of the body socket’. Then it goes on to say ‘…….With a No3 bolt head the left edge…………..’ But I want you to forget this because the statement was too ambiguous. I suggest that you use my maxim of ‘WITH ANY SIZE OF BOLT HEAD FITTED THERE MUST BE RESISTANCE OF THE BOLT ONTO THE .074” GAUGE PRIOR TO THERE BEING A MINIMUM OF .050” FROM THE UNDERSIDE OF THE BOLT LEVER TO THE CONTACTING POINT OF THE BODY SOCKET. I want the master Masons among you to learn that by rote! Using this criteria, if a No3 bolt head starts to resist half way closed and a No2 resists at .051” from the body side, then use the No2 bolt head. Remember DON’T OVER CHS There are a couple of reasons for this. Firstly, it is from a point when the underside of the bolt handle is approx .15” from the sharp curve between the top of the body and the side of the butt socket, that the bolt effectively ceases to move any further forwards and is effectively locked. The second is that prior to the point of fully locking, a feature called ‘mechanical safety’ comes into operation and (it’s getting technical now……….) the stud on the cocking piece will strike the stud between the short and long cam groove at the rear of the bolt causing a diminished force of blow to the striker, resulting in a miss-fire! Phew! You will understand that this is a highly condensed précis of events taking in months of learning, investigating and examining undertaken by apprentices and I’m trying to cram it into a 40 minute lesson! This brings me to another point………. It’s very basically this. If you cannot get headspace, even using the very relaxed criteria I have discussed here by using a new bolt and a No3 bolt head, then I’m afraid that it means your body is knackered. This quaint old Armourers technical term indicates that it’s seen better days ….., it’s xxxxed! You COULD allow yourself up to, say, .078” headspace but the technical opinion reached during research into this during the 50’s is that it’s a palliative and not a true cure. There is more to headspacing than just size - maybe even more important is Bolt-head overturn : Check the bolt head to ensure it does not overturn by more than 20 degrees when assembled to the bolt. The 20 degrees may be measured as 4.76mm (3/16”) from the left corner of the bolt head lug to the left corner of the bolt column. An over-rotating bolt head allows all the recoil to be taken on the threads, with in few rounds your headspace will be back to where it was. A picture speaks a thousand words :    |
Posted By: tharruff
Date Posted: July 17 2020 at 12:03pm
|
I just looked at my Field Gauge...it is marked '303 BRIT FIELD'...no manufacturer's name. It measures 0.070. To figure out what I 'think' that I need for a bolt head for this No 4 Mk 1 rifle, I put layers of masking tape on the face of the size '0' (0.625) bolt head until the bolt closed 'about' 75% of the way. Then I measured the dimension over the tape pieces. It measured 0.634...so THAT is why I think that a bolt head measuring 0.635 / 0.636 will work in this rifle. Apparently the masking tape was about 0.003 thick...each layer. This is the same procedure that I used to select the size for the bolt heads for the two No 1 Mk III rifles that I worked on and once I found the dimension that I 'thought' that needed and bought them, they both worked. I would be interested in trying the 0.637 bolt head in my rifle if you would be interested in selling it. If so, please send me a PM...
(also need the recoil plate and its mounting screws for a No 4 Mk 2 rifle if you might have them) |
Posted By: Shamu
Date Posted: July 17 2020 at 12:39pm
|
Just to clarify all this, ask for a No4 Bolt head measuring 0.637" which is what you really need, no matter if it says its a # whatever the measurement is the key. ------------- Don't shoot till you see the whites of their thighs. (Unofficial motto of the Royal Air Force) |
Posted By: Goosic
Date Posted: July 17 2020 at 1:10pm
|
Quote [To figure out what I 'think' that I need for a bolt head for this No 4 Mk 1 rifle, I put layers of masking tape on the face of the size '0' (0.625) bolt head until the bolt closed 'about' 75% of the way. Then I measured the dimension over the tape pieces. It measured 0.634...so THAT is why I think that a bolt head measuring 0.635 / 0.636 will work in this rifle. Apparently the masking tape was about 0.003 thick...each layer.]Quote From a machinist point if view, each layer of tape is infact a separate layer with it's own thicknesses. Regardless of the adhesive used,you still have gaps between the layers and, unlike a steel shim the tape is compression able. Both of which will give false readings. I found another #3 with a length of. 635" that is complete and is .010" over your .625". I will PM you shortly...
|
Posted By: The Armourer
Date Posted: July 17 2020 at 1:32pm
You haven't actually said it failed headspace, and using the incorrect (0.070" SAAMI) gauge rather than the correct 0.074" military 'Go' gauge is not helping matters. There are only 2 headspace gauges in the British military "Reject" (Go) and "High Limit" (No-Go) For maintenance purposes there are other sizes eg, after rebuild the headspace must be no more than 0.067". Thee have been many 100's (1000's ?) of Lee Enfields needlessly consigned to the great scrapheap in the sky by the use of incorrect gauges - maybe if you obtained / begged / borrowed or purchased the correct gauges you would find that it passes the specification. Retaining the existing bolt-head also means that you won't have to buy dozens of "#3" bolt heads before you get one that clocks correctly, as well as headspaces correctly.  |
Posted By: tharruff
Date Posted: July 17 2020 at 1:44pm
|
Okay...to The Armourer, To clarify...the rifle failed headspace with the size '0' bolt head (0.625 length) and my 0.070 field gauge. The bolt closed right down. When the face of the bolt head was built up with 0.009 of masking tape the bolt closed 'about' 75% of the way. That is my rationale for seeking a bolt head that is 'about' 0.635 which in the scheme of things would 'typically' be a size 3 bolt head.
|
Posted By: Goosic
Date Posted: July 17 2020 at 2:12pm
| PM sent tharruff |
Posted By: Goosic
Date Posted: July 17 2020 at 2:28pm
.070" field gauge and the bolt closed. You added what you can only assume was .009" of tape to a bolthead with a length of .625". Remember there is a crush factor you are over looking regardless of how lightly you move the bolt down. Simple math would suggest a bolthead at .634" as s replacement. However, the correct headspace gauge is set at .074" a difference of .004" from your field gauge. .004" closer and you end up with a replacement bolthead of .630". Which would "typically" be, a #1 or #2 bolthead,depending heavily on which factory actually made the bolthead.
|
Posted By: The Armourer
Date Posted: July 17 2020 at 2:47pm
In the greater scheme of things a 0.635 bolt head could be a #0, but certainly a #1 or #2. Do not overheadspace.
You are not really giving the rifle a 'fair crack of the whip, firstly you test it with the wrong gauge and then use compressible tape which allows it to close 'about' 75%. Why do you think 'about 75%' is the correct figure for the test ? The correct test is for the bolt to not close at all, 99% closed is a pass, 100% closed is a fail. Inventing your own specifications / standards is not really very professional, or very informative. There is a standard why not actually work to it ? I posted earlier the method for closing the bolt and the 'pressure' required, if you actually use the correct gauge and correct method and then see if it fails. I'll say no more on the subject.
|
Posted By: Goosic
Date Posted: July 17 2020 at 3:54pm
I have a No4MkI* with a #0 bolthead with a measured length of .6285". I also own a .070" field gauge and a .074" NoGo gauge. The second photo will show the bolt completely closed on the .070" The last photo will show the bolt handle just past the halfway point of being closed with the .074" gauge. The difference of a mere .004" shows up greatly and can be very misleading if you use the wrong measuring equipment. You will also notice that my #0 is .0035" larger then the posted .625"...   
|
Posted By: britrifles
Date Posted: July 17 2020 at 7:04pm
|
I’d suggest before you give up on the bolt head you already have, get a .074 Field Gage. You could also consider using 0.003 or 0.004 steel shim stock between bolt head and gage. As long as the bolt does not close on the Field gage, the headspace is acceptable. Remember, scrupulously clean bolt head, chamber and gage, then use very light finger pressure on the bolt handle as you close the bolt. Having said all that, I prefer headspace to be a bit tighter because I shot a lot and reload. But thats another subject.... |
Posted By: Jonnybravo
Date Posted: July 20 2020 at 3:34pm
|
he!!o everyone....I’d like to thank everyone that has taken an interest in my project and thanks for all the great information! I’m prior military and have always had an interest in getting an Enfield. I held off for many years because I could never figure out which version to get. Now I never thought in a million years I would find one in the trash and have it turn out to be the one I would favor the most too! I’m planning on getting the original stock pieces and I have a bayonet for it. I would like to put a finish on it but not sure which way to go on that. I have access to get it plated in black satin zinc. It’s very close to the finish of the magazine. The zinc would offer corrosion protection too. Anyone have a thought on my black zinc option? Would I get all metal parts plated the same color(ie:bolt and bayonet)? ------------- Thanks, Dave |
Posted By: Goosic
Date Posted: July 20 2020 at 10:41pm
|
My only two cents here will be for you to avoid adding any finish to the bolt. Zinc plating just like chrome plating adds material. Added metal finish on the bolt could have negative effects in way of functionality. You said you have a bayonet. Does the rifle barrel still have the bayonet lugs? If the bayonet lugs are missing and the barrel is not 24.5",getting a full stock set would not be advisable...
|
Posted By: britrifles
Date Posted: July 21 2020 at 5:00am
|
It appears in the photos that the original phosphate is still intact. There may be something available that is close to the black enamel that was used as the top coat finish. The rifle I just refinished already had almost all the paint removed and areas of the phosphate sanded off. I completely stripped the old finish and refinished with Birchwood Casey Perma Blue and I am very happy with the results.   |
Posted By: Jonnybravo
Date Posted: July 22 2020 at 5:07am
So are these pictures of your refinished job or are you showing the phosphate finish? I’ve done cold bluing that has lasted 30+ years.....is there anything that allows for a black phosphate looking finish? ------------- Thanks, Dave |
Posted By: Jonnybravo
Date Posted: July 22 2020 at 5:49am
|
just found this.... Duracoat Firearm Finish - Can Only - Matte Black https://www.amazon.com/dp/B01IE79SBW/ref=cm_sw_r_cp_tai_wudgFb9YAK0DP" rel="nofollow - https://www.amazon.com/dp/B01IE79SBW/ref=cm_sw_r_cp_tai_wudgFb9YAK0DP Any thoughts or experience with this? Seems like it might be the solution. ------------- Thanks, Dave |
Posted By: Jonnybravo
Date Posted: July 22 2020 at 6:05am
|
more on duracoat.... https://www.duracoatfirearmfinishes.com/collections/duracoat/products/duracoat-standard-colors-blacks?variant=38808658953" rel="nofollow - https://www.duracoatfirearmfinishes.com/collections/duracoat/products/duracoat-standard-colors-blacks?variant=38808658953 ------------- Thanks, Dave |
Posted By: Jonnybravo
Date Posted: July 22 2020 at 6:10am
|
.....and then there is a parkerizing! https://www.duracoatfirearmfinishes.com/collections/parkerizing" rel="nofollow - https://www.duracoatfirearmfinishes.com/collections/parkerizing Interesting stuff....I hope someone here can recommend a true to original/accurate finish . ------------- Thanks, Dave |
Posted By: Jonnybravo
Date Posted: July 22 2020 at 6:28am
 here is an example of the Parkerizing finish. It is on the barrel, receiver and mag. Does his seem to be close to an original finish/color? here is an example of the Parkerizing finish. It is on the barrel, receiver and mag. Does his seem to be close to an original finish/color?------------- Thanks, Dave |
Posted By: Jonnybravo
Date Posted: July 22 2020 at 8:10am
| it is hard to find anything on the original color and finish on a 1943 BSA......would appreciate help on this. As with my 69 Mach 1 parts restoration.....if I have to paint it....might as well paint it the original color/ sheen. |
Posted By: Jonnybravo
Date Posted: July 22 2020 at 8:13am
| to answer a previous question.....yes it is 24.5” long barrel, and yes it has bayonet lug. |
Posted By: Shamu
Date Posted: July 22 2020 at 8:19am
|
This is a much later (1955) rifle but the paint is exactly the same. Its a semi-matte or eggshe!! black. A friend of mine did a restore with either Ceramakote or Duracote (I forget which) & it was perfect. They ARE a heat cured paint though so you'd need some way of heating the painted parts. I don't believe you can Parkerize over existing Parkerising & it's very tough to remove in a non-destructive way. You may be better off just cleaning the surface & over painting it.  ------------- Don't shoot till you see the whites of their thighs. (Unofficial motto of the Royal Air Force) |
Posted By: Goosic
Date Posted: July 22 2020 at 8:52am
Shamu had stated earlier that the rifles were painted with a hard to find Suncorite. The closest you will get to matching that is by using VHT header paint or Barbecue Grill paint. Another finish the rifles used was to have them heated to a glowing orange color and then dipped in oil. Oil Blackened and Suncorite paint are your two old school original forms of finishes. In my supplied photo, I used four bottles of Birchwood Casey Super Blue to get as close to as possible to an oil blackened finish on my 1943 No4Mk1* Savage without having to resort to heating the rifle to 750-900 degrees farenheit and then dipping it in used engine oil. You can go with Parkerizing or whatever finish you prefer,the choice is ultimately yours to begin with.  |
Posted By: britrifles
Date Posted: July 22 2020 at 9:55am
|
[/QUOTE] So are these pictures of your refinished job or are you showing the phosphate finish? I’ve done cold bluing that has lasted 30+ years.....is there anything that allows for a black phosphate looking finish? [/QUOTE]
Dave, the phosphate is a dull grey finish. The photos are the Perma Blue finish, and quite black as shown in the photo. The Perma Blue instructions call about complete removal of the old finish system, down to bare metal. |
Posted By: Jonnybravo
Date Posted: July 22 2020 at 11:28am
|
thanks for the pictures! Called DuraCoat’s firearm dept and decided that their standard color called “Parker #6” is a very close match for the BSA enfield . It is a parkerized color....and not their Parkerized coating which is a little different . About a week and a half till paint arrives. Will post progress pics as it happens. Last paint question......which parts should be the same color? Magazine, bolt parts, swivels forend bands and screws?
|
Posted By: Shamu
Date Posted: July 22 2020 at 12:36pm
|
Pretty much all the metal except the magazine spring & follower (blued) & the bolt head (in the white). The cocking piece is blued as well. ------------- Don't shoot till you see the whites of their thighs. (Unofficial motto of the Royal Air Force) |
Posted By: englishman_ca
Date Posted: July 22 2020 at 2:31pm
|
I have had good luck with oil blackening. But the temperature I take the metal up to is only to around 450f (straw to brown colour) well below critical temp for having any effect on the heat treatment. Multiple passes will get it as black as I want.  Oil blackened repop nose cap on left. Oil blackening is as tough as nails. Once it is on there, it needs blasting or sanding to get it off. There is a technique to getting it evenly dark without streaks or spots. With careful preparation (linnishing) and done right it is impossible to tell from a factory finish. The other finish that I use is slow rust browning (bluing). Nothing out of a bottle or can will replace elbow grease and patience. Two great finish techniques to have in your tool kit. I can use either finish to make a part look mint condition, or can be taken back to replicate age and honest wear. Now that being said, I own more than one rifle that has a temporary coating of black rattle can paint (Tremclad) as corrosion protection fr om the elements and hard use in the bush. Been temporary for about ten years now. ------------- . . Look to your front, mark your target when it comes! |
Posted By: The Armourer
Date Posted: July 22 2020 at 11:58pm
|
Here is how it was originally done on the SMLE. Many of the original ingredients are carcinogenic so it would be very difficult today to be able to recreate the 'witches-brew'  |
Posted By: Jonnybravo
Date Posted: July 23 2020 at 3:28pm
 so...parts came in and went on this morning. I am dry impressed with the action on this piece. Very smooth. Also ran it to a gunsmith for a once over and headspace check....turns out he didn’t / couldn’t find the gauzes he thought he had. However, he did think the finish (Gray) was original. He also suggested trying the go/no go gauge first. I’m not sure where to get one(I’d be willing to pay shipping both ways if one is up for loaning out). I still need to the 2 screws for the rear charging handle to set the firing pin. Is the a special tool for screwing the firing pin in or does that get screwed in all the way by hand? so...parts came in and went on this morning. I am dry impressed with the action on this piece. Very smooth. Also ran it to a gunsmith for a once over and headspace check....turns out he didn’t / couldn’t find the gauzes he thought he had. However, he did think the finish (Gray) was original. He also suggested trying the go/no go gauge first. I’m not sure where to get one(I’d be willing to pay shipping both ways if one is up for loaning out). I still need to the 2 screws for the rear charging handle to set the firing pin. Is the a special tool for screwing the firing pin in or does that get screwed in all the way by hand?------------- Thanks, Dave |
Posted By: Shamu
Date Posted: July 23 2020 at 4:40pm
|
Its screwed in till the "stop collar" contacts the internal shoulder in the bolt head. Uncocked the pin should protrude between 0.040" & 0.50". Remember the "scallop' should align with the locking screw head. in the back end ------------- Don't shoot till you see the whites of their thighs. (Unofficial motto of the Royal Air Force) |