Aftermarket triggers?
Printed From: Enfield-Rifles.com
Category: Enfields
Forum Name: After Market Enfields
Forum Description: What have you done to that Enfield??
URL: http://www.enfield-rifles.com/forum_posts.asp?TID=4265
Printed Date: March 26 2026 at 6:03pm
Software Version: Web Wiz Forums 12.07 - https://www.webwizforums.com
Topic: Aftermarket triggers?
Posted By: Cliff H
Subject: Aftermarket triggers?
Date Posted: December 03 2010 at 11:19am
|
Just wondering whats the most popular in here. The only two that i know of is the Huber concepts and the Canwest triggers. Are there any others? Does anybody have any input on either of the two triggers mentioned. Im also wondering if the factory military trigger can be lightened up some? I dont have a problem with the two stage, just the 10lb pull on the second stage!! I would love to do something about my trigger on my #1. I would rather go with the Canwest because it seems similar in build and function to Timney triggers, which i have on a couple of swede mausers that ive sporterized. I just cant afford it, last i checked its running $140.00. The Huber triggers run about $80. I can afford this one, but its just not that impressive of a trigger to me for some reason. I supose i would like some feedback on the Huber for sure if any of you have went with his trigger.
Thanks all and have a Happy Holidays....Cliff |
Replies:
Posted By: Shamu
Date Posted: December 03 2010 at 10:15pm
|
Adjusting length of first & second pressure is fairly easy, as is changing trigger pressure. I've done several of them and all you need is a fine stone, some tape, a bit of cardboard & some patience. ***DISCLAIMER! As always don't mess about with trigger mechanisms unless you are sure of exactly what you are doing** If you are interested in trying this yourself, let me know & I'll post a how-to with pictures. What is involved is stoning the front edge of the cocking piece where it engages the sear tip so that the angle is changed slightly. ------------- Don't shoot till you see the whites of their thighs. (Unofficial motto of the Royal Air Force) |
Posted By: Cliff H
Date Posted: December 04 2010 at 2:13am
|
Shamu
I was hopeing that someone would chime in and say that the military trigger could be reworked. This would be worth trying before i spend any money on the aftermarket versions. Have you measured the amount of pull on the second stage of any of the ones that you reworked. I have to get it down to at least 2-2.5 lb's for my liking. A how-to with pictures would be great if its not to much trouble! Thanks for the help....Cliff |
Posted By: Cliff H
Date Posted: December 04 2010 at 5:03am
|
I just found this article. This describes the correct and safe way of doing this trigger modification. http://www.gunreports.com/special_reports/long_guns/GunReports-Working-Lee-Enfield-American-Gunsmith-Gunsmithing-Rifle1858-1.html In this article the authur goes into discusion about trigger mods and this is what he concluded with....... "There is a modification that qualified gunsmiths—novices should avoid such work— can make that works very well when done correctly. Add a small weld bead to the top angle of the sear where it contacts the frame. File it down until it is smooth and to the point where it locks onto the bottom 2 millimeters of the sear face of the cocking piece. You get a smooth trigger pull, a short stroke, and safety all in one. Do not try anything less than a two millimeter latch." Has anyone done this perticular type of trigger mod?? |
Posted By: Shamu
Date Posted: December 04 2010 at 5:57am
|
I usually set them up for 2 1/2~# Lbs for first pull & 3 1/2~4 1/2 for second. This was the original spec so it's what I aim for. As for the "qualified gunsmith remark" I advise folks wanting to try the trigger mod to buy a spare trigger ( $4~10) & work on that one. If they mess up all they have to do is put the original back in. The weight of pull is a separate operation from the "bump surgery"  as most of the work is done to the flat on the cocking piece. Again I suggest you get a spare & mess with that based on the same idea. Personally I never add anything to the sear, in fact I don't touch it at all. I specifically suggest you do not, ever mess with the height of the piece! as the writer says this is foolhardy & you don't strike me as foolish. You can "tune" the simple mechanism without decreasing safety. as most of the work is done to the flat on the cocking piece. Again I suggest you get a spare & mess with that based on the same idea. Personally I never add anything to the sear, in fact I don't touch it at all. I specifically suggest you do not, ever mess with the height of the piece! as the writer says this is foolhardy & you don't strike me as foolish. You can "tune" the simple mechanism without decreasing safety.My technique (I didn't invent it, but I do use it) is to change (very slightly) the angle of the bent (mating face) on the bottom front of the piece so that the sear slides over the surface with less effort. Essentially I polish the surface mirror smooth while angling the stone slightly. The combination of reduced friction & a smoother contact makes other work (IMHO) unneeded. You can make jigs from cardboard to both protect the bottom of the bolt cylinder, & keep the angle of the stone consistent. I do suggest taking care as you are messing with the fire control assembly of a rifle, but it is not impossible it just requires a realistic self evaluation of you skill level. If you can file, grind, or polish a flat surface without curving it then you can do this, if you always have a "bit of a curve you can't explain" then you probably shouldn't. ------------- Don't shoot till you see the whites of their thighs. (Unofficial motto of the Royal Air Force) |
Posted By: Cliff H
Date Posted: December 04 2010 at 12:49pm
|
Yea I alleady have been looking out for a spare trigger or two just to practice on. I dont think Im sold on the mod in the article just yet. Not quite sure whats going on with that mod anyway. I'll have to talk with my Gunsmith to see if he can explain exactly what that mod is actually doing for the trigger. As far as my skills, Im capable of just polishing and slightly changing the angle of the bent. Im looking forward to seeing your How-to. Thanks for the incouragement by the way. Ive actually done some of this same type of work on a couple of older Crosman pellet pistols that i have. And they turned out great, compared to what they were.
So to lighten up the second stage to say 2-2.5 lbs, is this done by putting more angle on the bent? |
Posted By: Tony
Date Posted: December 04 2010 at 4:10pm
|
Be careful. Lightly polish the trigger but remember a hair trigger is potentially lethal.
------------- Rottie (PitBulls dad.) “If electricity comes from electrons, does morality come from morons Born free taxed to death!!! |
Posted By: Shamu
Date Posted: December 04 2010 at 9:29pm
|
Yes as you make the bent angle sharper the sear nose has less friction & so slides easier reducing friction & so weight of pull. The trick is to change the angle by a very slight & predetermined amount. I'd be a little nervous making the second pull so light by the way. You need a first pressure because of the design & it's not a good idea to have first & second so close to each other & first is created by the tension of the "V" spring so you can't change it much at all. If I were doing this I'd call a safe minimum 4Lbs. Anything beyond that & you're heading for trouble. Whatever you do, check for safe operation after doing it! Cock an EMPTY rifle & bang the butt sharply on the floor, it shouldn't fire. Drop a cocked EMPTY rifle with the safety engaged in the same way, it shouldn't fire. Disengage the safety, it shouldn't fire either. Sorry to be repetitive but you need to take great good care when doing this type of work. Give me a couple of days & I'll post the pictures & diagrams of how to do this without endangering the operation of the rifle. ------------- Don't shoot till you see the whites of their thighs. (Unofficial motto of the Royal Air Force) |
Posted By: Shamu
Date Posted: December 06 2010 at 10:53pm
|
Assuming you have the spares fitted.
Here's the official method, complete with a diagram.
 ------------- Don't shoot till you see the whites of their thighs. (Unofficial motto of the Royal Air Force) |
Posted By: Shamu
Date Posted: December 06 2010 at 11:00pm
|
What you are doing is to smooth & polish the surface marked as "A" so that the sear "C" can slide along the face with minimum resistance. Frequently if you look at the "A" surface you'll actually see a groove or trough worn across the face. Usually all that is needed is to buff the face to make it mark-free & mirror finished. I do this with the bolt assembled, but removed from the rifle & I wrap the bolt shaftin tape & card to give me a guide for the correct angle. I only use a hard arkansas stone with oil to polish, moving the face vertically only, never horizontally. I strip, reassemble & test frequently as I go & I ABSOLUTELY ALWAYS test for function of the bolt, sear & safety after doing any such work. Any issue, no matter how minor & I go back to the original parts untill I can figure out & fix whatever problem I've created by tinkering.
As a final touch I clean the mechanism at the first & second pressure bumps on the trigger & lightly grease the flat shaft of the sear where they make contact ("B" & "D"). I also put a small dab of grease on the bolt's cocking piece face.
I would only go to a slick 3 1/2~4 1/2 Lbs doing this & Iwould absolutely avoid any removal of metal from the underside of the cocking piece, this is just getting too light for safety. If you can't live with a slick 4Lb pull then you really need to get an aftermarket trigger which is redesigned to give that very light pull with safety. Personally I'm very happy with a good 2-stage 4 1/2 Lb trigger so I do the mod being discussed. Try a good pull, ait heavier than you're asking for first & see how it works for you, if it doesn't then get the aftermarket trigger, put the original parts back on the bolt & chalk it all up to experience. ------------- Don't shoot till you see the whites of their thighs. (Unofficial motto of the Royal Air Force) |
Posted By: Cliff H
Date Posted: December 08 2010 at 2:38am
|
Shamu, your the man. Thanks so much for the help. I'll surely take my time with this and triple check all safety precautions as I go. I could be happy with a 3.5-4 lb trigger pull over a $80-130 aftermarket trigger anyday!
Did the illustration come out of a book of somekind? Ive been wanting to get the How to accuraize a enfield rifle book ever since i saw it on the net a few weeks ago. Did this come from that book?
|
Posted By: Shamu
Date Posted: December 08 2010 at 5:27am
|
It came from an old armorer's manual reprint I found at a gunshow. I've been collecting info on the rifles for quite a while & have a reasonable amount of stuff on the #4 models. ------------- Don't shoot till you see the whites of their thighs. (Unofficial motto of the Royal Air Force) |
Posted By: Aifwikir
Date Posted: December 09 2010 at 9:16am
|
WOW! Now I have a Winter project that doesn't involve my motorcycle. Thanks Shamu! Great info.
Aif
|
Posted By: Shamu
Date Posted: December 09 2010 at 9:55am
You could just bring it to the pool. That's where I messed with FIRESTARTER's trigger & his mind. You should have seen the look on his face when I attacked his Irish contract with a Leatherman & increased his trigger pull at first! Fortunately I was able to fix the problem & he left with a nice 4 1/2 Lb pull. Now if we could get DELTA-10 involved that would probably be a 1 1/2 Lb pull that was safe  ------------- Don't shoot till you see the whites of their thighs. (Unofficial motto of the Royal Air Force) |
Posted By: Aifwikir
Date Posted: December 10 2010 at 10:20pm
|
I thought mine was already a nice pull, it's setting at about 6# but smooth. A little bit long but not bad for a military trigger.
:D
Aif |
Posted By: Shamu
Date Posted: December 11 2010 at 1:27am
|
That's nice for an Enfield. IIRC the spec was 3 1/2 # for first stage & 4~ 51/2# for second stage. Hey you hit stuff you aim at with it so it can't be too bad  ------------- Don't shoot till you see the whites of their thighs. (Unofficial motto of the Royal Air Force) |
Posted By: Aifwikir
Date Posted: December 11 2010 at 5:36am
|
I may polish the surfaces a smidge (technical term) and see how it works out.
Aif
|
Posted By: Shamu
Date Posted: December 11 2010 at 7:10am
That usually helps. Oh & a dab of real slick grease.
------------- Don't shoot till you see the whites of their thighs. (Unofficial motto of the Royal Air Force) |
Posted By: Cliff H
Date Posted: December 11 2010 at 12:54pm
| I allways thought it was a bad idea to grease up triggers. Ive always just smeared a very little amount, using a q-tip, of light oil on all the contact points. |
Posted By: Shamu
Date Posted: December 11 2010 at 10:51pm
|
I go with the "If it spins, oil it, if it slides grease it" theory myself. A LIGHT coat of an APPROPRIATE grease as well. Make sure it has the ability to remain unfrozen in cold temperatures, for example. Like you I use a Q-Tip & one greasy one does the whole mechanism both on the FCG & the bolt. ------------- Don't shoot till you see the whites of their thighs. (Unofficial motto of the Royal Air Force) |
Posted By: Shamu
Date Posted: December 06 2014 at 6:16am
|
You're correct. Timmey & those "cock on open conversions" are for Mauser type actions of the p-13 / P-14 / M1917. The only replacement triggers I know of for the Lee-Enfields are the Ball bearing replacement trigger only from Huber Concepts: http://huberconcepts.com/product/lee-enfield-trigger/" rel="nofollow - http://huberconcepts.com/product/lee-enfield-trigger/ or the complete replacement fire train from CanWest. http://www.lee-enfieldrifles.com/guns.html" rel="nofollow - http://www.lee-enfieldrifles.com/guns.html ------------- Don't shoot till you see the whites of their thighs. (Unofficial motto of the Royal Air Force) |
Posted By: W.R.Buchanan
Date Posted: December 07 2014 at 1:16pm
|
I actually went and bought a trigger pull gauge. The results were somewhat interesting as the #4 Mk1 BSA gun had a 5 lb 7 oz trigger pull after installing the correct Cocking Piece. This trigger has a very small amount of creep about .030 before let off due to the way the angles are set up on these triggers. IE; the Cocking Piece moves to the rear just before firing, because as the bent moves thru it's arc the strait face of the sear has to be at an angle to that arc and is never really tangent to that arc but intersects the arc instead. This was done for safety. The #4 Mk1* Long Branch has a pull of 5lb 12 oz. but has less creep and it appears that the amount of engagement is less on this gun. IE the Bent is not as far up the sear as it is on the other gun. Also the MK1 had a substantial groove in the sear face of the original cocking piece, no doubt from the Mad Minute drill. The replacement part was new, but I still buffed it to a mirror finish anyway. I used silicone grease on these parts as they do slide against each other. After reading Shamu's instructions on modding the trigger I can see how the engagement can be altered slightly. I might do this someday when I am bored. Another way I prefer to look at this subject is,,, if the let off is crisp and the creep is minimal you can learn the trigger. Every gun is different, and that is to be expected. Every gun I own and shoot frequently must be approached from a "what does it take to get a proper surprise break with this gun," mentality, everytime I shoot it. This usually takes 1-2 shots to refresh my memory as to what works with the gun I'm holding. I think a 5-6 lb. trigger on one of these guns being used in the field as a hunting rifle is entirely appropriate, as long as it is a clean let off. On a gun that might get dropped or be used as a walking stick ultimately safety is more important that a light perfect trigger break. As long as the trigger is a reliable one, down in the 3-4 lb. range would be as low as I would go for a field gun. I have a friend who is a big time bench rest shooter. he let me dry fire his gun and the trigger is about 2-3 oz and I literally had to touch it 10 times before I could get a let off when I wanted it. However that gun is only fired at a bench at targets so the trigger is appropriate for it. As a hunting rifle, even a Varmint Rifle, you would negligent discharge every shot for sure. Sometimes you gotta run what you brung. Trigger work in my opinion is a place where you have to know when to quit. It is not a case where more is necessarily better and safety should be your main concern. I installed a Dayton Traistor Trigger in my Swedish Mauser. I ahd to fool with it a lot to get it to where it didn't fire when the safety was released. If you pulled the trigger when the safety was on it would not reset as the safety was not lifting the striker far enough off the sear to allow it to reset. I finally got it to work right and congratulated myself and put it aside. Well,,, a few days ago I picked up and decided to try and see how fast I could run the bolt. It fired everytime I closed the bolt! It will be replaced with a Timney. Randy ------------- It's not how well you do what you know how to do,,, It's how well you do what you DON'T know how to do. |
Posted By: Shamu
Date Posted: December 07 2014 at 1:59pm
|
Something so simple its frequently overlooked is a small dab of grease, (not oil) on the cocking piece's front edge where the sear rides. You'd be amazed how much of a difference it can make. ------------- Don't shoot till you see the whites of their thighs. (Unofficial motto of the Royal Air Force) |
Posted By: W.R.Buchanan
Date Posted: December 07 2014 at 4:57pm
|
I AGREE, and the thing about the simple Enfield design is that it will fire in virtually any environment from tropical to artic, wet or caked with mud, and whereas the grease might freeze, the trigger would only get a little stiffer and not seize up completely.Newer style triggers that are encased in a box have to be pretty clean and dry or they will stop functioning. For guns that are going to be worked really hard like a subsistence gun for a Ranger or some such application, and be subjected to use and abuse with little maintenance ,,, the simpler the better. The beauty of the WWI Bolt Action Rifle is definitely in the simplicity of the designs. The Mauser, Nagant, Enfield, Springfield, and 1917's all had this simplicity built in. Randy ------------- It's not how well you do what you know how to do,,, It's how well you do what you DON'T know how to do. |
Posted By: DrkVsns
Date Posted: January 19 2015 at 6:17am
|
not sure if anyone has asked but could you post the how to pics on the trigger job |
Posted By: DairyFarmer
Date Posted: January 21 2015 at 7:42am
|
We have a company here (Thor Engineering) in South Africa that makes adjustable triggers of No1's and No4's. They don't sell directly, only through retailers. Last I looked they were about US$55 - US$85 http://www.enfield-rifles.com/forum_posts.asp?TID=4948" rel="nofollow - http://www.enfield-rifles.com/forum_posts.asp?TID=4948 They also make good quality scope rings. ------------- If farming was easy, then everyone one would do it. |
Posted By: Shamu
Date Posted: January 21 2015 at 8:18am
|
That looks similar to the CanWest sold here, a replacement box assembly. I assume they won't fit the Mk2's with the hung trigger as the bracket is in the way? ------------- Don't shoot till you see the whites of their thighs. (Unofficial motto of the Royal Air Force) |
Posted By: Canuck
Date Posted: January 21 2015 at 4:16pm
|
I'd have to say you are correct about that, Shamu. (Nor do the ATI polymer stocks, they won't fit the Mk2's without cutting). ------------- Castles made of sand slip into the sea.....eventually |
Posted By: dsklcsw
Date Posted: November 18 2018 at 11:03am
| I just did my No.4's trigger. Polished all the surfaces and did a slight downward angle on the cocking piece. It's down to 2.5 lbs according to my trigger scale. The first stage is just kind of a really light drag, but now the let off is crisp and light, almost too light. It doesn't drop the hammer when I drop it on the butt from about 6-7 inches with or without the safety on so I think I'm safe. Anything else I should check to make sure it's safe? |
Posted By: Zed
Date Posted: November 18 2018 at 11:48am
|
There is one important safety item to check on your modified trigger. On the standard cocking piece; when pulling the trigger to 1st stage, you will see it move rearwards very slightly. If you then release the trigger; like when you decide not to shoot. The cocking piece should return to the forward position, raising the sear up the face. This is critical; because if it does not, the sear could easily slip off the edge of the cocking piece if the rifle is bumped. Dishcharging the round. 2.5lbs sounds a bit too light for me; that is below our Service rifle rules on this side of the pond. ------------- It's nice to be important, but it's more important to be nice! |
Posted By: Pukka Bundook
Date Posted: November 18 2018 at 12:37pm
|
Dsk, Engage and disengage safety with it cocked. It should stay cocked. Then drop butt to the floor and see what happens. a 3-4lb pull if all is smooth is no problem, but yours may be OK. just test it fairly severely To Be Sure. Best, R.
|
Posted By: Shamu
Date Posted: November 18 2018 at 3:06pm
|
Absolutely! I made a custom Rem 700 LR rifle a while back. Custom stock, Shillen "phone pole" 24" BBL Timmey trigger, Tubb alloy firing pin, al the "super-acurate" goodies & so on. It regularly shot 1/3 MOA with hand-loads @ 300yds. (I went nukkin futs trying to get 1/4 MOA!). When I had it "just right" I checked the trigger pull, mainly because I was concerned it might be "too light". It was 3 1/4 Lbs! (But so smooth it felt like about 1 3/4!) it was the classic "like a glass rod breaking". Smooth is better than light IMO.  ------------- Don't shoot till you see the whites of their thighs. (Unofficial motto of the Royal Air Force) |
Posted By: Zed
Date Posted: November 19 2018 at 4:10am
|
I like that rifle Shamu. Is it in .308? Would love to try out something like that at long range. ------------- It's nice to be important, but it's more important to be nice! |
Posted By: Shamu
Date Posted: November 19 2018 at 6:37am
|
Yes its a Remington 700 BDL in .308. ------------- Don't shoot till you see the whites of their thighs. (Unofficial motto of the Royal Air Force) |
Posted By: W.R.Buchanan
Date Posted: November 19 2018 at 10:12am
|
Shamu: Nice looking gun and I would be very happy with 1/3 MOA! Now you need one of my Hand Presses to take to the range for load development to eek out that last little bit!. Goto http://www.buchananprecisionmachine.com" rel="nofollow - www.buchananprecisionmachine.com and check out the finest Portable Hand Reloading Press ever made. Available to you with a 10% "Friends and Family Discount." Randy 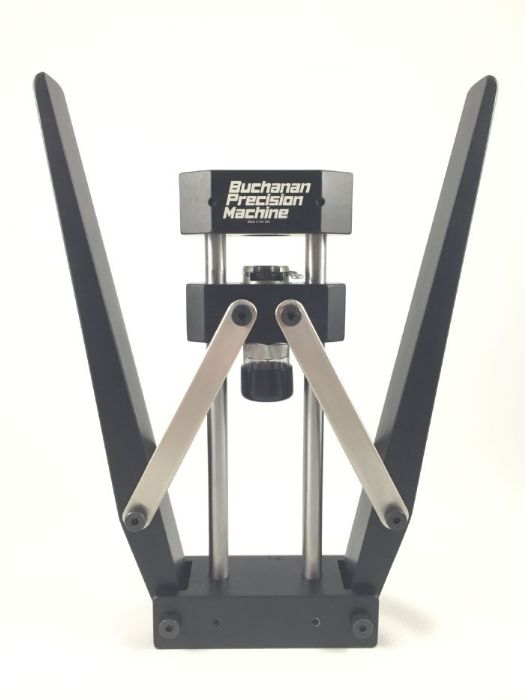 ------------- It's not how well you do what you know how to do,,, It's how well you do what you DON'T know how to do. |
Posted By: Honkytonk
Date Posted: November 19 2018 at 10:39am
| A little OT, but a story on trigger adjustment. Buddy bought a used Tikka .22/250. It had been bedded and sported a 4x12 Leupold. Very accurate at the range but trigger pull was scary light! He wanted it adjusted. By my scale it was 16 oz. We had to take the action out of the stock but found the adjustment screw. After some tinkering, got it where he liked it. #2.5. (still light in my mind!) Then we applied some blue Lok Tite and Bobs your uncle! |
Posted By: englishman_ca
Date Posted: November 19 2018 at 11:08am
|
"Add a small weld bead to the top angle of the sear where it contacts the frame." EEK! Right away, to me that makes the 'gunsmith's' Lee expertise a little suspect. The bent on the cocking piece should be polished to a mirror. Try that first it without changing any angles or removing anything but a coontair (a negligible amount) of material. The tip of the sear should radiussed at the edges and be smooth too. Help things slide. There is a lot going on with the functionality of the trigger group. It looks simple in concept, but it is a tuned mechanical system, very clever the way it is done and what it does. If you 'improve' one aspect, there is a good chance you will f**k something else up. It takes a number of times to master. If you want to give it a try, yes, have at her. But suggest that you buy another set of trigger parts to work on, chances are that you will screw up the first few sets that you 'adjust'. This is the voice of experience talking here.  I have a bunch of cocking pieces and sears in the junk drawer because of my best intentioned handiwork. I have a bunch of cocking pieces and sears in the junk drawer because of my best intentioned handiwork. ------------- . . Look to your front, mark your target when it comes! |
Posted By: Shamu
Date Posted: November 19 2018 at 2:34pm
|
Actually that's a variation on a factory technique! (scary as it may sound). The factory had a special tool you could make which "split" the rear of the frame, peeling a small "finger" down to achieve the same result. Its not the engaging (rear) surface, you can polish that too, but what it does is slightly lower the engagement between the sear's upper bent where it contacts the front of the cocking pieces bent. Done properly its safe, but the amount you have to drag the sear over the face is reduced so reducing "creep" in second pull. Instead of bending the receiver lip down he's adding metal to the top of the sear arm.   ------------- Don't shoot till you see the whites of their thighs. (Unofficial motto of the Royal Air Force) |
Posted By: englishman_ca
Date Posted: November 19 2018 at 6:14pm
|
Thanks for that Shamu. The pics in the diagrams are exaggerated for illustration. The material upset to move the resting position of the sear is mere thousandths of an inch. Another common related and connected problem found is the sear tip dragging or clipping the under lug on the bolt as it passes. I have seen instances of the under lug filed down to give clearance. I did see armourer's notes about removing material from the lug, but only a minimal amount. As the body wears, it allows the sear to sit at rest higher and higher until the tip starts to touch the lug as it goes by. The fix is to use the handy dandy tool as your diagrams show, the tool pretty well locates itself and a whack with a hammer upsets material where the sear rests against the receiver body. Armourer's notes says that this can only be done once, then the body is scrap. I get exactly the the same result using my pet center punch. I put a pair of punched dots approx 1/16 inch from the edge of the body down inside the gallery. The punch marks are enough to displace material to lower the sear. If not, tap, tap, tap to make the punch marks deeper displacing more metal. There is fine window of adjustment between the sear tip sitting nicely to the bent's edge and clearance to the under lug. I have found that often with reworked and 'adjusted' cocking pieces, a happy medium cannot be found. Too easy to try to fix one thing and screw up another. I have had much practice in screwing things up. However, I do learn from my mistakes. I screw up less as I get practice. I have learnt that if and when I inspecting a cocking piece for selection for a project, if it has anything other than the original factory grind on the bent, I pass on it. A slight wear mark is fine, but no improvement with a stone thanks. Not worth the headache, the result is always a disappointment. Too many people think that they know what they are doing and f*** things up with triggers and sears. I spend a lot of time undoing others' 'improved trigger pull'. Invariably I end restoring proper function by changing out modified parts for untouched ones to get things working as they should. Junk rifles get stripped and sold off as parts. Lots of buggered sears and cocking pieces for sale on ebay. I can tell just by looking at pics, or, by the lack of pics. Caveat emptor. ------------- . . Look to your front, mark your target when it comes! |
Posted By: Shamu
Date Posted: November 20 2018 at 6:15am
|
Yeah its a subtle thing. but if done properly it worked. The weld dot is a different way of doing the same thing though you can put on a dab & stone back to fine tune with some "Dykem"to show engagement on the sear face. ------------- Don't shoot till you see the whites of their thighs. (Unofficial motto of the Royal Air Force) |
Posted By: englishman_ca
Date Posted: November 20 2018 at 7:57am
|
I have to strongly disagree to the use of his weld method. To me it is only one step up from JB Welding brass shim stock to the back of the sear (I found such on a Bubba special, there was more to it than that. It did work, but just making it work is not a repair to my standard...). To move the position of the sear tip where it rests on the cocking piece bent face, we are talking only thousandths of an inch at the sear stop in the body. Seems a bit redundant to me to add a blob of weld on the sear (which is a casting) and then file it all back except for two or three thou. However, there are more than one ways to skin a cat. This method works for the dude, but this gives me the impression that he has never read the Instructions for Armourers, or if he has, he thinks that he knows better than they. Nowhere ever will you find instructions to weld anything anywhere on any part of a Lee. I could have the sear rest position adjusted and set in less time than it would take for him to pull his welder out. As always, filters are required for information found on the internet. ------------- . . Look to your front, mark your target when it comes! |
Posted By: W.R.Buchanan
Date Posted: November 20 2018 at 10:59am
|
I must be missing something here. What does tweaking that little tit actually do. Does it just limit the amount of engagement of the Bent with the Sear? Also I guess I have some misunderstanding on the names of the parts. There is a Trigger,,, The thing you pull, The Bent which is the Vee shaped piece, and there is the Cocking piece which has the Sear hanging down to interact with the Bent ? What I have found on my guns is that the sear on the cocking piece always seems to have a little groove in it where the Bent engages it as the bolt is closed, or more properly Slammed shut during reloading. This needs to be stoned out. The Angle of the Sear is such that as the bent slides down towards release it actually pushes the cocking piece rearward. I don't think this was done on purpose but is just the product of the tip of the Bent moving thru an Arc due to being pivoted around a fixed point. Instead it proved to be an important safety feature. Changing the angle of the Sear would be unsafe IHMO as that resistance of the cocking piece moving to the rear prevents the Bent from inadvertently sliding off the sear and firing if mis-handled, which happens frequently in the Trenches of a Battlefield. Both my guns have a trigger pull which is right at 6 lbs with about a 1/16th to 1/8th" of creep. The point in the creep just before let off is easily learned. We call it Slack Plus and then bang. The "6 lbs" part is mostly due to the power of the Striker spring not the mechanics of the trigger system. If you want to reduce the trigger pull weight the easiest way is to install a weaker Striker Spring. Wolf Springs from Brownell's probably has something. I have found that a little dab of some Moly Grease on the sear face and on the bumps of the trigger itself works wonders on the smoothness of the trigger on these rifles. My personal opinion is that trying to radically improve the Trigger pull on these guns is similar to improving the trigger on a 12th Century Crossbow, as this mechanism is about one click above that in sophistication. My .02 Randy ------------- It's not how well you do what you know how to do,,, It's how well you do what you DON'T know how to do. |
Posted By: Shamu
Date Posted: November 20 2018 at 2:10pm
|
The upper bent (arm) of the sear (the "V" shaped thing) rests about 3/16" up the front face of the cocking piece (the flat bit at the back of the bolt.) By stopping the sear rotating 100% bringing the top bent UP fully you reduce the "extra" engagement beyond the actual tip itself. This in turn means you don't have to drag it across the "extra bit" of the cocking piece face before it releases. This gives a feel of a smoother trigger. It should be fully engaged, but as little as possible extra.  The thing is, as deceptively simple as the mechanism seems there's a lot of compound leverage going on in there, dropping the 20Lbs, or so, of striker spring pressure down to the 3 1/2 ~5 Lbs of trigger pull! Very small changes can be magnified dozens of times as the process goes from slack to first pressure to second pressure & then releasing the striker. Because of that great care & a big dollop of experience is needed before safely messing with it.  Just look at how switching from the first trigger "bump" to the next one changes the dynamic of the action (A & B) for example, that how "First & Second" pressure is created. You mention stoning the groove out of the cocking piece, which brings another 2 variables into play! The face is only case (surface) hardened, if you stone that away the metal is quite soft & will wear abnormally, you also have to dead nutz on accurately maintain the exact angle too as that determines a lot of the triggers weight!  ------------- Don't shoot till you see the whites of their thighs. (Unofficial motto of the Royal Air Force) |
Posted By: englishman_ca
Date Posted: November 20 2018 at 2:48pm
|
Trigger is the thing that you pull, the V shaped thing is the sear, the cocking piece is at the back of the bolt and the flat front face of it onto which the sear bears is called the bent. Basically much the same on any trigger system, the sear trips off the bent to release. The angle of the bent and action of the sear moving the cocking piece rearwards when you pull the trigger, as you have observed, is not by accident. With a properly adjusted trigger group, if at the point of trigger break, you relax trigger pressure, the sear should slide back up the bent and the cocking piece moves forward returning to its rest position. This is useful in that the trigger resets if you change your mind and dont fire. Otherwise the trigger would sit still at the point of breaking when you let off which could be unsafe. Changing the angle of the bent lightens trigger pull but at the expense of the trigger resetting. Another reason not to adjust if you don't know what you are doing. The system is very clever, two trigger pressures using two different mechanical advantages by use of two moving parts. Uses just one spring common to both trigger system and magazine release. Brilliant! Simple but sophisticated. (Can you tell that I am a big fan of the design?) For simple, check out the early Lee Metford system. It also resets if you release the trigger. 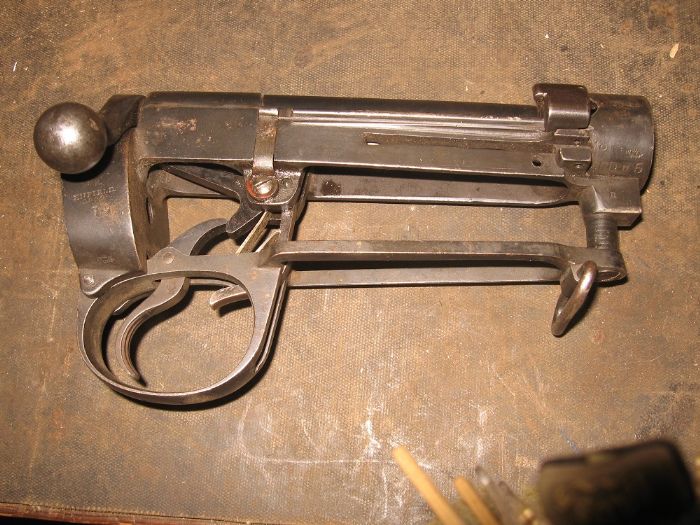 ------------- . . Look to your front, mark your target when it comes! |
Posted By: W.R.Buchanan
Date Posted: November 20 2018 at 6:46pm
|
This answers some questions. Stoning the "bent" as you call it is not hard to get right if you stone cutting tools regularly. Probably .002 or less is removed, and the angle is not changed as long as you keep the diamond stone flat against the face. If you rock it back and forth like amateurs do then you will screw up the part. The part about Case Hardening is for sure, but it has to be a little more than .002 deep so you can do this at least once and get away with it. Even with the case it is not all that hard if the sear will dent it. Randy ------------- It's not how well you do what you know how to do,,, It's how well you do what you DON'T know how to do. |
Posted By: englishman_ca
Date Posted: November 20 2018 at 8:19pm
|
Some people can use a stone and keep things perfectly flat by hand and eye. Stoning the bent for me is best achieved by jigging the cocking piece to present it squarely to a guided stone. I cheat by holding the cocking piece in a tiny bench vice that has parallel jaws and a flat top. I position the nose of the cocking piece so that its bent is flat and level with the top surface of the vise jaws. I then use that top surface to keep my stone flat and square. I finish off with with jewellers rouge on a linen cloth wrapped on a flat metal backer to bring on the polished shine. The mark where the nose of the sear has worn, I find usually does not make a problem with pull off, even if there is a little divot. The initial movement of the first stage trigger pull overcomes it without one even feeling it. A new old stock cocking piece right out of the preservative will benefit from a bit of a polish too. Just ensure that you work with strokes in the same direction as the travel of the sear (vertical). No matter how polished surfaces are, when they slide against each other, there will be drag. The goal is just try to minimise it. Changing out the striker spring for a lighter one actually has a minimal effect on the weight of trigger pull, but can cause other issues. I have a .22 trainer that has a lightened striker spring, lightened sear spring and a polished bent. It breaks crisply at about three pounds, but way too sensitive for a battle rifle. I can get away with it because .22 rim fire cartridges don't take much of a striker hit to crush the rim and fire. ------------- . . Look to your front, mark your target when it comes! |
Posted By: Shamu
Date Posted: November 21 2018 at 7:09am
|
In all honesty I don't stone the parts. Zed has a neat jig he made too. I have "polished" them with a bit of "Scotchbrite" if they're brand new though. I find this smoothing together with a small dab of embedding graphite grease I get the same effect without risking klutzfingerdness to become involved! (A little schmear on the trigger "bumps", the flat on the lower bent where they contact the sear, the cocking piece front face & the tip of the upper leg of the sear with a single Q-tip is plenty)
------------- Don't shoot till you see the whites of their thighs. (Unofficial motto of the Royal Air Force) |
Posted By: Zed
Date Posted: November 21 2018 at 12:02pm
|
The cocking piece bent angle on the L39 is different to that of the standard No4.The L39's trigger weight is less because of the change in angle; as the rifle was specifically for targhet shooting. However the sear still rises back up the bent face if you decide not to shoot and release the pressure on the trigger. So it is still safe. When deciding to modify the trigger of my No1 MkIII*, I decided to set the bent angle mid way between the standard rifle and the L39; therefore unsuring a proper safety margin. ------------- It's nice to be important, but it's more important to be nice! |