Working the Ishapore, Part 1, Tools and Safety
Printed From: Enfield-Rifles.com
Category: Enfields
Forum Name: Ishapore Enfields
Forum Description: Let's see those Indian Enfields!
URL: http://www.enfield-rifles.com/forum_posts.asp?TID=6581
Printed Date: March 26 2026 at 8:17pm
Software Version: Web Wiz Forums 12.07 - https://www.webwizforums.com
Topic: Working the Ishapore, Part 1, Tools and Safety
Posted By: ozzlefinch
Subject: Working the Ishapore, Part 1, Tools and Safety
Date Posted: January 14 2014 at 7:42am
|
This is the first installment of what I hope to be mercifully short series of how I improved the accuracy of my Ishapore Enfield from being a dog of a rifle into something that can actually hit the target in a consistent fashion. I first picked up this rifle way back in the late '80s, the exact date escapes me. Over the years I've come to really love this firearm, for both it's history and it's capabilities. I have learned about it, by first hand experience, picked up the hard way, some useful bits about the Ishapore that may be helpful to others. Much of what I've done is generic to any center fire rifle, I've just put them together for the Ishy. Ishapore Enfield is an excellent rifle. It was the last bolt action rifle issued to regular army troops and embodies the sum of decades of Enfield knowledge. However, as good as it is, it did suffer from a poor final finish work at the factory that detracts unfairly from it's place in the Pantheon of Enfield history. Some of the metal components were machined, but did not have the machining marks polished out. Some of the wood work is sloppy and interferes with the functioning of the rifle. The good news is that all of those defects can be fixed, mostly for free. In the interest of full disclosure, I am not a professional gunsmith, I do not make any claims that my methods are the best, and any and all modifications you make to your rifle is 100% on you. This series is for informational purposes only, and I highly recommend that any work on a firearm be done by a qualified professional. This is just a sharing of knowledge about how I did the work on my rifle, for myself and without any compensation. Part A: Safety This should be a no-brainer, but it needs to be said again. NEVER WORK ON A LOADED FIREARM! NEVER PULL THE TRIGGER TO SEE IF THE RIFLE IS LOADED! 'Kay? There is a term for people who break this rule, it's called "natural selection". To unload the Ishy: 1. Pull the bolt all the way to the rear. 2. Drop the magazine and remove from the rifle 3. Observe the chamber. Hold the muzzle to a light source and observe the reflection in the empty chamber. If you can't see the light, then run a cleaning rod from the crown to the chamber. The rifle is clear when you see the rod in the feed ramp area. 4. Take all of your bullets and move them to a different room in the house so you have NO temptation whatsoever of putting one in the rifle while you are working on it. Better yet, let your significant other hold them for you. Part B: Tools and their use Observe photo 1. I have laid out about 95% of every tool you will ever need to work on the Ishy, minus the firing pin wrench. I will discuss each item in turn. First a word about tools. Most of the tools needed are common in any household, and the few more exotic ones can be purchased easily at any big box hardware store or tool outlet warehouse. Tools are how you get things done, so it's wise to purchase the best you can afford. A good quality tool with perform better, last longer, be more comfortable, and give a better end product. As you can see, my tools have many years and many projects behind them, so buying quality will save you money in the long run. But with that said, you don't have to spend a lot, get what you can afford and get better tools later on. Photo 1 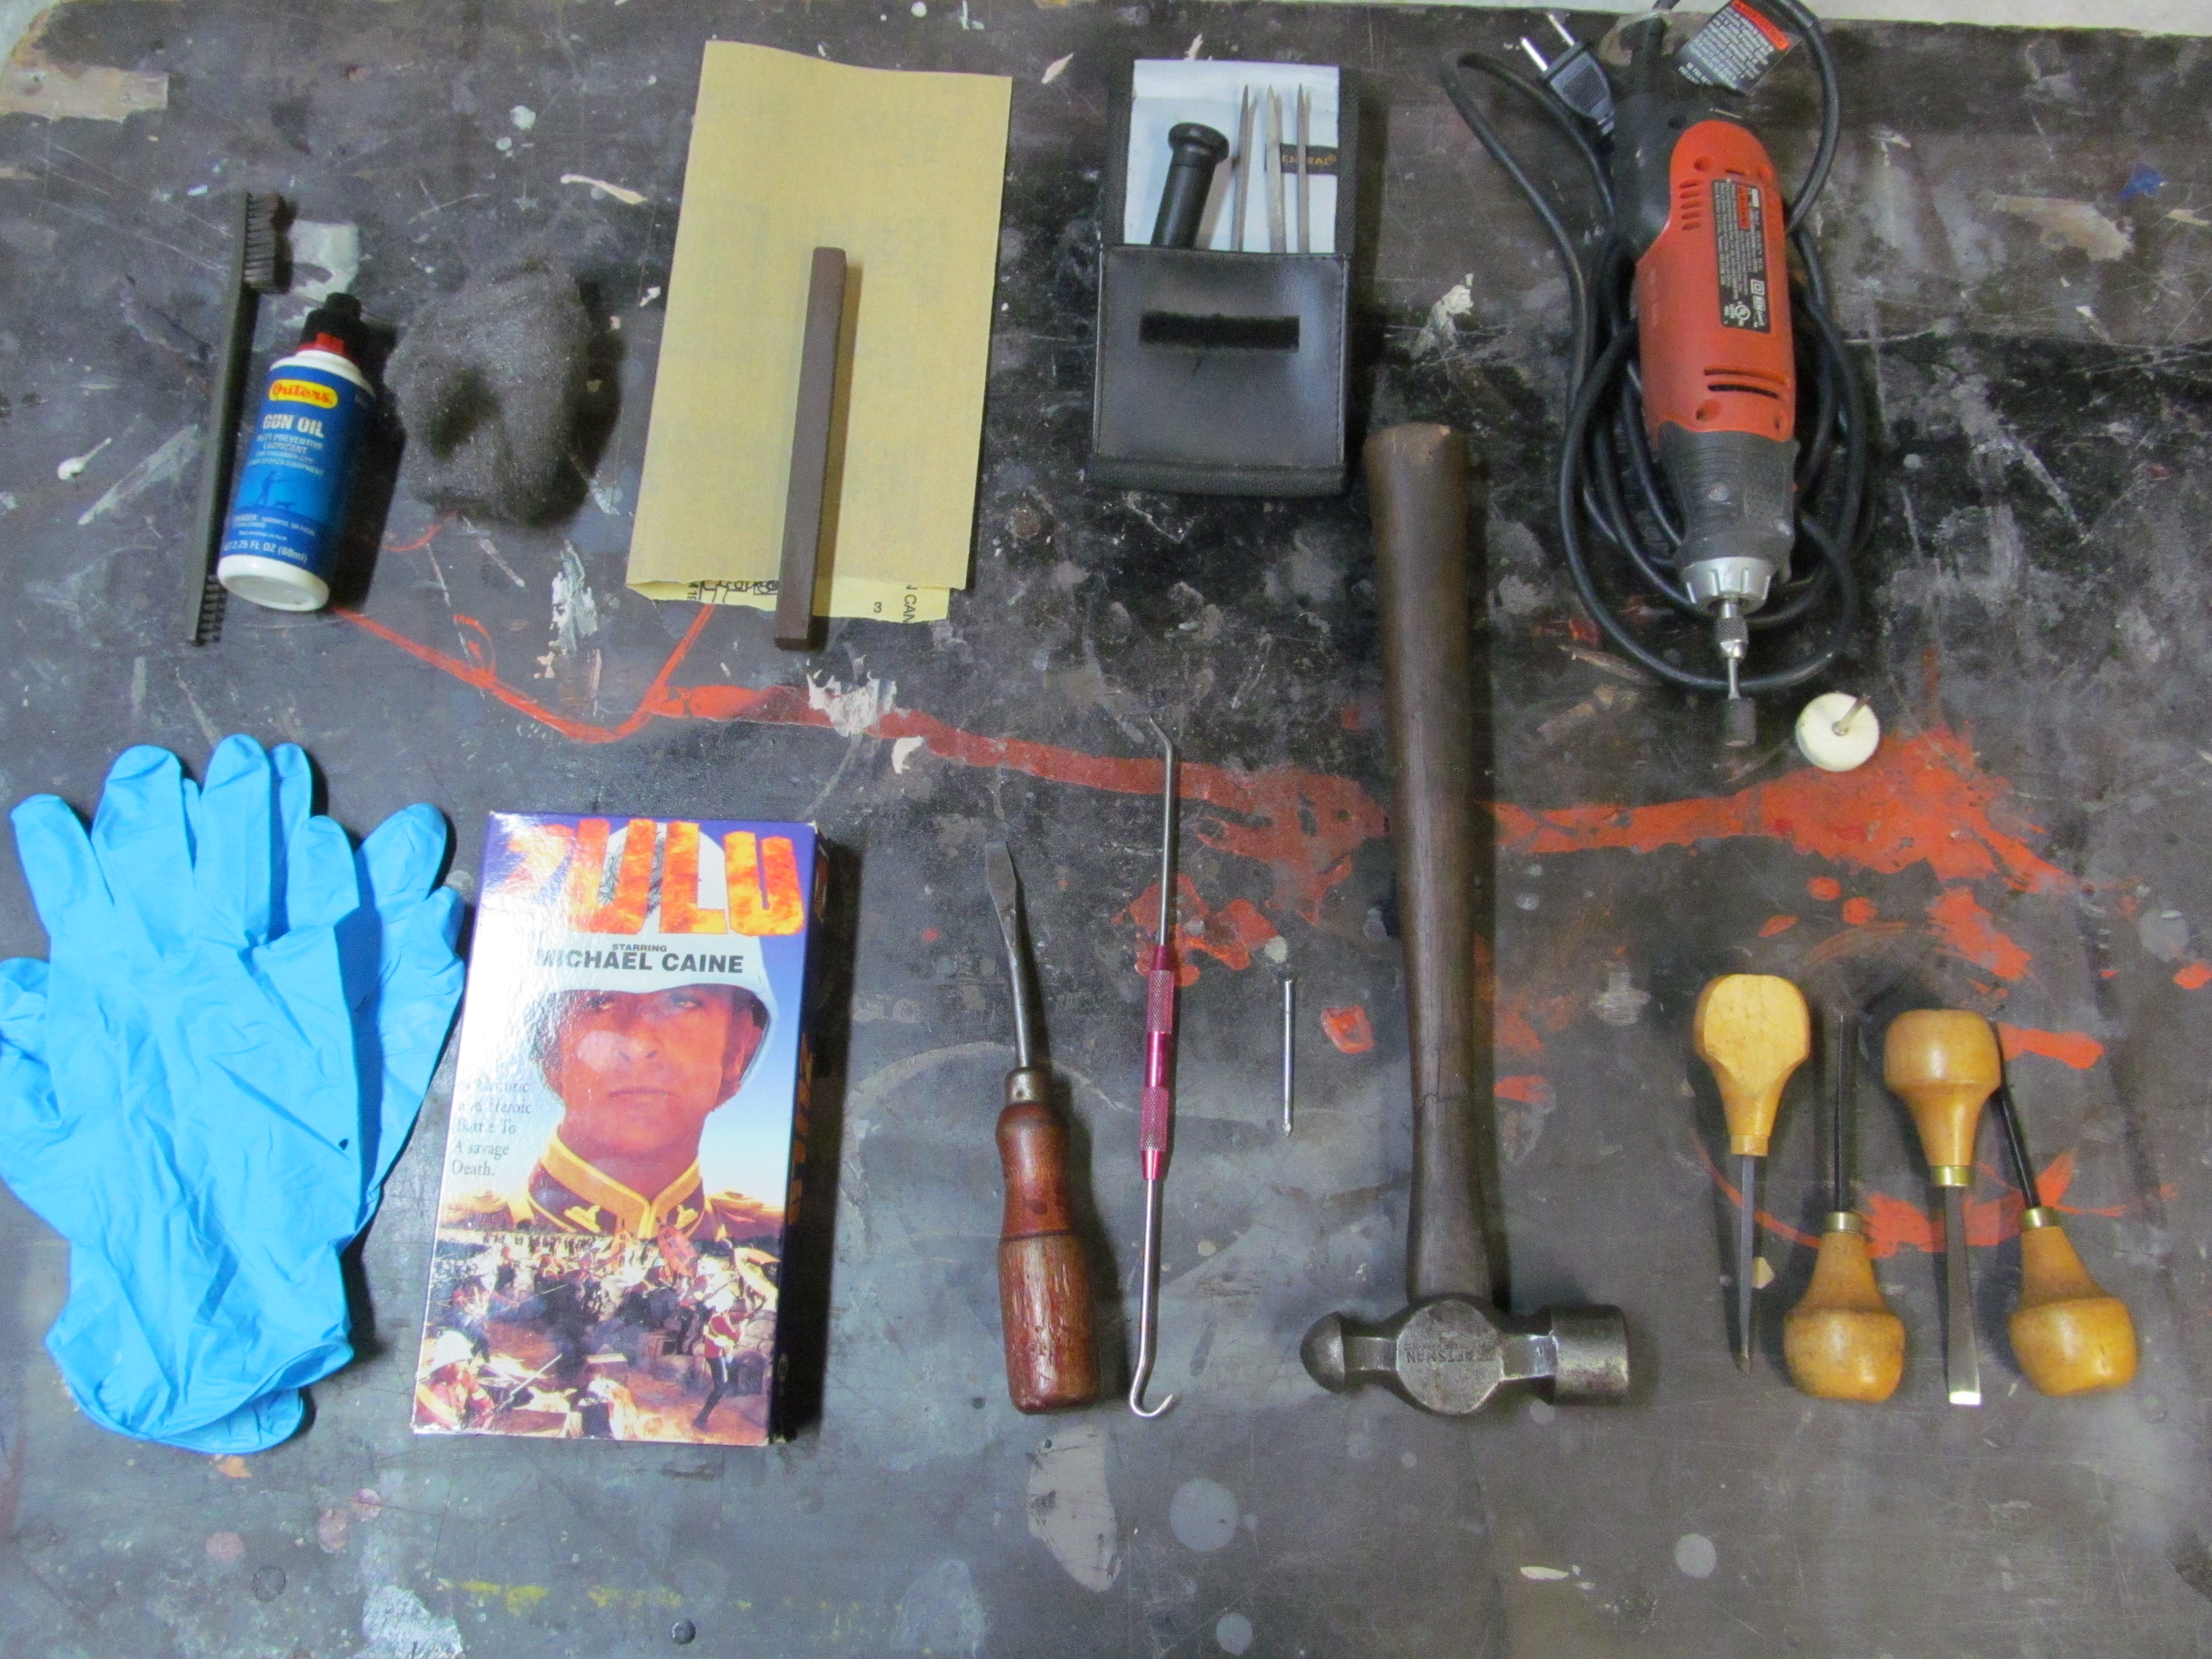 The first item is a work table. I use a retired Army folding field table, and as you can see, it's been used many times for many projects. I like it because it's portable, durable and it was free. If you have a nicer table (perhaps the nice wood one in the dining room) then be sure to cover it with a layer of thick newspapers or cork to protect the surface. Photo 2 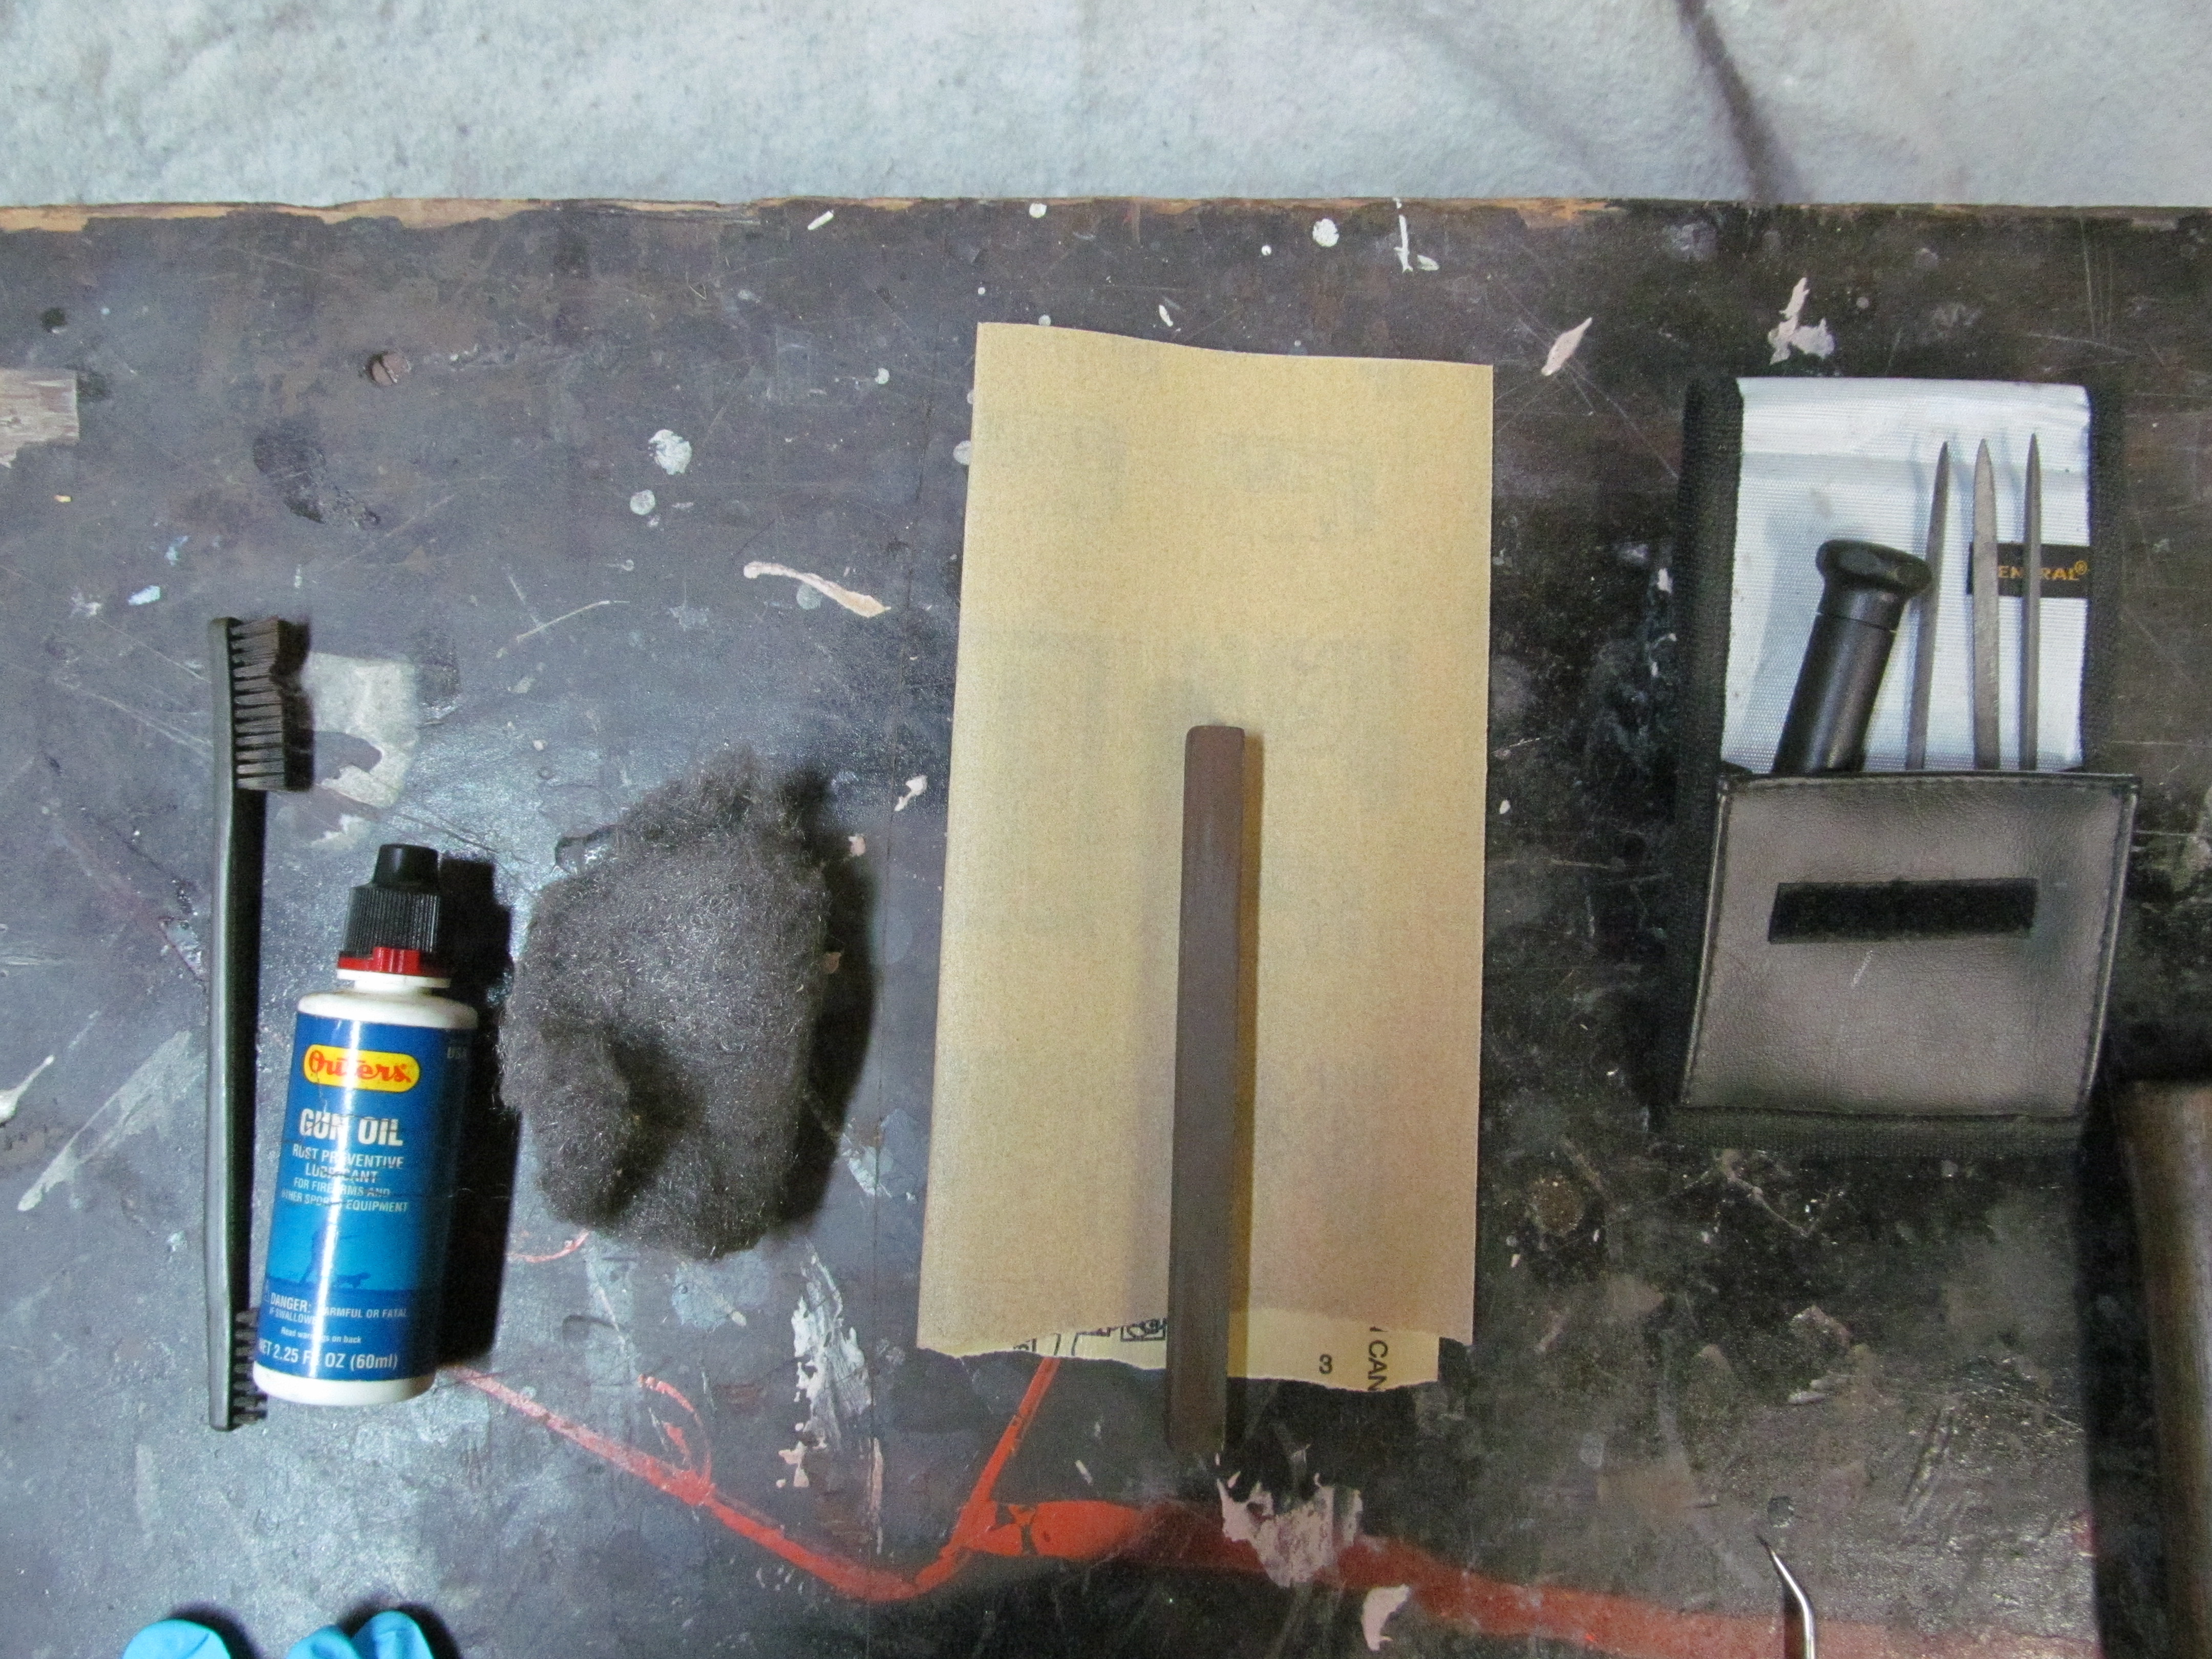 Observe photo 2. Here we see a cleaning brush, oil, steel wool, sandpaper, corborundum stone, and hobby files. The use for everything is self evident save for the corborundum stone. It's probably the most exotic tool in my inventory, but all it amounts to is a silicone carbide sharpening stone. I just like using the fancy name. Photo 3  Here we see a motor tool, mine is made by Black and Decker, but Dremel is another popular brand. Here it is shown with a polishing attachment. You can do without this, but it makes life so much easier it pays for itself in elbow grease and time saved. I don't consider it an option. The one shown here cost me about $20 at a big box store. Photo 4  Surgical gloves and WHAT? Surgical gloves keep your hands clean, 'nuff said. When working, I like to be comfortable, and being comfortable means watching a movie. Here I have selected a proper motivational film for the task I have in mind. Yes, it's VHS. Yes, I prefer VHS. VHS are mechanical, they work. They always work. They are the Soviet tractor of home entertainment. I pop one in, let it roll and do my work. And they are 3 for a dollar at the thrift shops, and a good VHS player can be bought in the same store or a yard sale for about 5 bucks. I have amassed an impressive collection of "man movies" this way. Name a man-flick, I've probably got it. Photo 5  Hand tools. Screwdriver, pick, hammer and a small nail. The nail is used as a drift to remove the small pins on the trigger group. The other tools are obvious. Photo 6  This is a set of wood carving tools. Useful for relieving pesky wood bumps in important areas of the rifle stock. I picked up this set for about $10 at a big box tool outlet shop. You don't necessarily have to buy these, but the first time you have to sand down that hard wood on a barrel channel by hand you are going to wish you did. I also use these for any number of other projects where a delicate touch is needed to shape some wood. That's about it. Not a lot when you sum it up. To buy everything on the table would cost you under $60 and last a lifetime with proper care. Hope you enjoyed this installment, another will come soon, but I make no promises as to when :) Remember, free advise is worth every penny! ------------- Politicians aren't born. They are excreted |
Replies:
Posted By: Canuck
Date Posted: January 14 2014 at 8:15am
|
This series looks to be interesting and a novel idea as far as gun sites is concerned, IMHO. Bravo Ozzlefinch! Looking forward to the next installment. ------------- Castles made of sand slip into the sea.....eventually |
Posted By: ozzlefinch
Date Posted: January 14 2014 at 8:45am
|
Thanks Canuck. I almost had fun writing it! I'm sharing what's in my tiny brain under the belief that it may save somebody some of the problems I went through. Perhaps it may help somebody, perhaps not. The Ishy improvement I did are, as I stated, mostly generic to either any given center fire rifle, or generic to any given Enfield. I guess I just want people to start looking at the Ishy as a "real" military firearm and not just some backwater Indian knock off job that doesn't deserve a second look. Had I known how much of a relationship I would end up having with the Ishy the day I bought it, I would have gotten 3 or 4! I think I paid for it the princely sum of $69 or $79 off the rack at Rose's department store. Try that nowadays! ------------- Politicians aren't born. They are excreted |
Posted By: A square 10
Date Posted: January 14 2014 at 10:53am
|
OK , im in for the duration , nice photos - so far i have everything except the VHS .....ill think on that a bit before jumping 'back in' .... please know ever entry will be followed by many who lurk , but dont post [for whatever reason] so dont expect too much feedback , does not mean there is not interest ,
|
Posted By: Bear43
Date Posted: January 14 2014 at 10:59am
| ozzlefinch, I like that you started out with the safety warning. Many of us make the assumption of others knowing the standard safety procedures, but there will no doubt be some inexperienced people that will read this too. Safety reminders never hurt. |
Posted By: ozzlefinch
Date Posted: January 14 2014 at 7:13pm
|
I'm not expecting much feedback. I'll be happy if it get's people thinking about actually shooting the 2A1 instead of having it sit on a rack collecting dust. And truthfully, this is how I have fun with the militaria collection. As far as safety goes, don't worry. It will get redundant. very redundant. In fact, I will hammer safety so much that everybody will be sick to death of me talking about it. There is no excuse for violating a safety rule, and there is no such thing as a firearm "accident". Every "accident" is caused by negligence or ignorance. There is no excuse for stupidity, but ignorance can be fixed. We are not at war here, we are hobbyists and enthusiasts. Any unintended firearm discharge not only hurts the person that is the immediate victim, it also hurts the gun rights of others, the shooting sports, and the collectors. ------------- Politicians aren't born. They are excreted |
Posted By: Zed
Date Posted: January 14 2014 at 8:09pm
|
I'm also looking forward to part 2 of this Ozzlefinch. I can relate to the "watch a film" technique; having wayched "On Any Sunday" while cleaning the frame of one of my motorcycles (a Moto Martin framed Z1) in the apartment a few years back. Managed to get most of it done before the wife was up.
There is a very interesting Ishy project in Roger Wadhams book on Enfield accurizing, and has sleeved the original barrel with a carbon fibre tube, bonded on to minimise flex in the barrel. With apparently good results. Looks cool too! I want one! ------------- It's nice to be important, but it's more important to be nice! |
Posted By: Jon287
Date Posted: January 15 2014 at 4:50am
|
I will gladly take all the gunsmith lessons I can get. Just trying to restock my Long Branch is turning out to be much harder than I thought. ------------- Now is the time for all good men to come to the aid of their planet!! |
Posted By: muffett.2008
Date Posted: January 15 2014 at 5:10pm
|
Interesting article so far. Just a couple of points on presentation. Your pic. size is gainormous, you need to ensure all pics are resized under 1000 square, this eases the uploader and make the pic's viewable on all types of computers, remember you are being read on nearly every country in the world, with varying aged computers and varying upload speeds. The large font size also adds to the download time, mine got so slow I thought that I was virused, but as soon as I got to the replys in ordinary size, things were back to normal. Normally I skip any post with oversize pic's, they are totally distorted for me, but the subject matter was of sufficient interest to keep me reading. Good luck with your project. |
Posted By: ozzlefinch
Date Posted: January 15 2014 at 7:33pm
|
Thanks for the feedback muffett. I will take that into consideration on the follow ups. I used larger fonts so it would be easier to read, but that can be fixed easily. As for the photos, same deal, I am still learning this site and I will make the effort to reduce the size as you suggested. I do want it to be easy for the largest number of people possible, the trick is finding the right balance. Thanks again for the positive feedback. ------------- Politicians aren't born. They are excreted |
Posted By: Zed
Date Posted: January 15 2014 at 8:20pm
|
Yes Muffet,it's the size problem again!
The photo's appear distorted on my work computer, but ok on my I-mac at home. ------------- It's nice to be important, but it's more important to be nice! |
Posted By: Shamu
Date Posted: January 15 2014 at 8:40pm
|
Regarding image sizes, I usually just take my original image, copy it into a folder called "resize & post" . Then I open it in Windows "Paint", resize it to 800Xwhatever with "Preserve aspect ratio" set to ON & save it as its original name but with an "S" (for small) & then post it. Another option is to select "Standard e-mail view size" which is essentially the same. ------------- Don't shoot till you see the whites of their thighs. (Unofficial motto of the Royal Air Force) |
Posted By: A square 10
Date Posted: January 16 2014 at 1:54am
|
for once the photos did not come off too large for me , they appear smaller than 5th batts mkVI photos in another thread , not sure why that might be , but they came off OK for me .... i did have to "adjust" to the large type face as its not 'normal' to my eye - still not readable without my cheaters tho :>}
|
Posted By: muffett.2008
Date Posted: January 16 2014 at 4:53pm
| You've changed computers though, haven't you? |
Posted By: Shamu
Date Posted: January 16 2014 at 8:35pm
|
Just for reference the images are sized to 4320X3240. Your new computer's monitor software & so on may be doing a lot of re-processing to make them fit into your screen resolution. Basically I see the problem as an incredibly slow load time for the thread as your system renders the huge files into a presentable size. The posts in the second thread on this are way way better at 800X600! ------------- Don't shoot till you see the whites of their thighs. (Unofficial motto of the Royal Air Force) |
Posted By: A square 10
Date Posted: January 17 2014 at 1:48am
|
ah-haa that's what it is , yes i'm on a newer more powerful computer with a larger monitor , i did not think about that as this is a laptop in a notebook expansion base , much more compact that my old office set-up , just checked the second posting of this series and as the photos appear the same it must have been doing just that , photos look the same to me , and all loads the same speed too , but i like the re-sized text ,
|