Working the Ishapore part 3: Wood
Printed From: Enfield-Rifles.com
Category: Enfields
Forum Name: Ishapore Enfields
Forum Description: Let's see those Indian Enfields!
URL: http://www.enfield-rifles.com/forum_posts.asp?TID=6605
Printed Date: March 26 2026 at 6:35pm
Software Version: Web Wiz Forums 12.07 - https://www.webwizforums.com
Topic: Working the Ishapore part 3: Wood
Posted By: ozzlefinch
Subject: Working the Ishapore part 3: Wood
Date Posted: January 26 2014 at 3:32am
|
Working the Ishapore part 3: Wood working Still here I see? Well OK then my fellow Enfield enthusiasts. Sit back and tolerate my droning on about how I improved the accuracy of my 1967 Lee Enfield 2A1 Ishapore rifle in 7.62 NATO. In the last two installments I covered basic tools and safety as well as trigger polishing. The next logical step is to examine the wood parts of the rifle. In the interest of full disclosure, I am not a professional gunsmith, I do not make any claims that my methods are the best, and any and all modifications you make to your rifle is 100% on you. This series is for informational purposes only, and I highly recommend that any work on a firearm be done by a qualified professional. First, my comfort movie. I refuse to work without being comfortable, it's my little vice and one that I can certainly live with. For my work session this time I have chosen a time honored classic movie, in VHS format of course, "Conan The Barbarian" starring Ahnold. So strip down to your loincloth, oil up those muscles, and follow along as I do some lumber-jacking on the Ishapore.  Part A: Safety Because it ALWAYS needs to be said: NEVER WORK ON A LOADED FIREARM! NEVER PULL THE TRIGGER TO SEE IF THE RIFLE IS LOADED! Tired of hearing that from me? Too bad, I'm not tired of saying it. To unload the Ishy: 1. Pull the bolt all the way to the rear. 2. Drop the magazine and remove from the rifle 3. Observe the chamber. Hold the muzzle to a light source and observe the reflection in the empty chamber. If you can't see the light, then run a cleaning rod from the crown to the chamber. The rifle is clear when you see the rod in the feed ramp area. 4. Take all of your bullets and move them to a different room in the house so you have NO temptation whatsoever of putting one in the rifle while you are working on it. Better yet, let your significant other hold them for you. Part B: Lumber-jacking the wood This was the most time consuming portion of my rifle rework. For reasons unknown the Indians chose really nice wood, in my case the stock is Teak with Rosewood uppers. Nice, but they worked it at the factory with an ax and chainsaw, not to mention the color differences between the woods- but I'm ok with that. The color mismatch is original, and I'm way to cheap to bother finding replacements for a part that still works. I regret not having taken any "before" photos, so you will have to bear with me and suffer through the slings and arrows of photoshop, with lots of text description. I was quite baffled for a long time about why my rifle was so inaccurate. The bore is like brand new, the chamber is excellent, head-space is tight, so why couldn't two bullets follow the same path out the end of the barrel? The solution was simple, so simple I couldn't find it until it almost literally slapped me in the face. The fore-stock wasn't cut correctly. In fact, it was banana shaped. As anybody who has spent more than 5 minutes with any Enfield knows, the greatest weakness is that long, rubbery barrel. Volumes have been written about how to stabilize it and I won't go over all that again now. The problem I was having is that when the rifle was assembled and the screws tightened, the barrel was ever so slightly being pressured out of true. Well, it was being brutally bent out of true. Examine photo 1. The red line is the center of the barrel from the receiver to the crown. The yellow line shows how the receiver and barrel channel was cut into the wood. The angles are exaggerated, but the end result was an induced bow into the line of fire. This was causing the bullets to corkscrew upon leaving the muzzle, introducing significant probable errors into the target area. Photo 1  Yup, that's a real problem. The choice here is hard to make. Do I get a new fore-stock and hope it's better? Do I try to fix it? Do I make one myself? Or do I hang the rifle on the wall and not bother? What I decided to do was to see if I could fix it. I do so hate having a firearm that I can't actually shoot, so I figured that if I botched it, I would either junk the rifle, buy a new fore-stock, or sell it to somebody so they could Bubberize it. Either way, I had nothing to lose by trying. The fix was simple, but time consuming. Teak is a very hard wood, and once wood is removed it's devilish hard to put back. Working slowly, constantly checking progress and taking lots of breaks is the way to go. I started out by examining which end to fix. Do I align the barrel to the angle of the receiver, or do I fix the receiver pocket to match the barrel? In the end I met in the middle, by taking a little out of the channel and a little out of the receiver. I used my wood carving tools, sandpaper, and a whole lot of action movies to get this done. The goal was to have the receiver and barrel assembly sit in the fore-stock without applying any pressure to the metal parts. Working slowly, I finally got there. photo 2 and 3  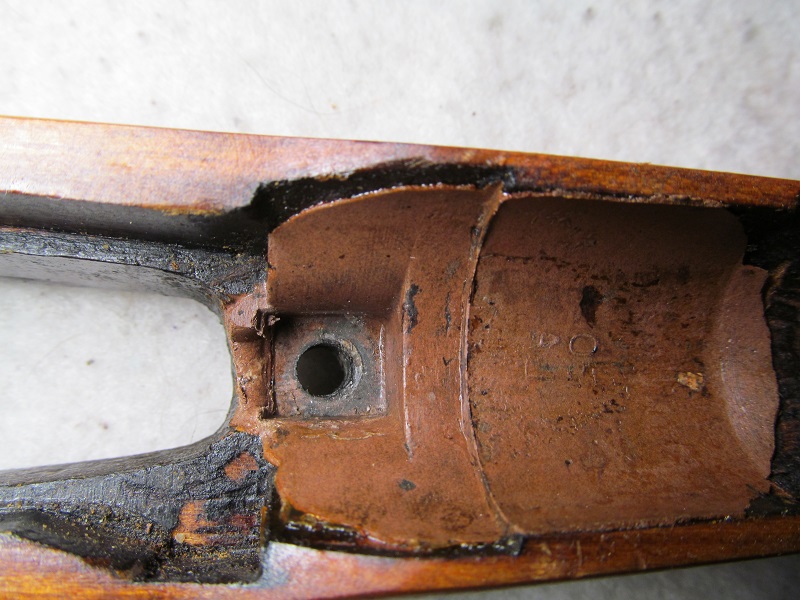 Examine photos 2 and 3. Notice the yellow circles. As you can see, one side of the barrel channel is now thinner than the other, when the rifle is assembled this cannot be noticed an nobody is the wiser. Except now, since I just told everybody. A new problem arose once I completed the wood relief. The front lug mounting area and rear of the receiver were now all loosey goosey, and that is bad for accuracy. Fortunately, we have a product called Probed 2000. Photo 4  Simply put, Probed 2000 is a two part epoxy filler designed specifically for the firearms industry. It's very easy to use and comes with comprehensive instructions. I made sure that all metal parts of the barrel were thoroughly coated with release compound and all screw holes were filled with clay. Neglecting to do those things would have been a disaster. The Probed has about a 5 to 10 minute working time, but a very long set time, about 24 hours, so I used clamps to hold the assembly in line while the compound set up overnight. As you can see in the photo, the lug and receiver are now once again tight to the fore-stock. I also put a little Probed on the butt stock, any place where the stock can wobble has the potential to introduce inaccuracy, so getting it tight to the metal was a priority. The middle barrel mount ring, once tightened also added to the pressure bow on the barrel. I went back and put a little bedding compound in the socket and now it holds the barrel without distorting it. The final thing to do was run a piece of sandpaper under the barrel channel to ensure that nothing was pushing on the barrel. Photo 5 shows what that looks like. 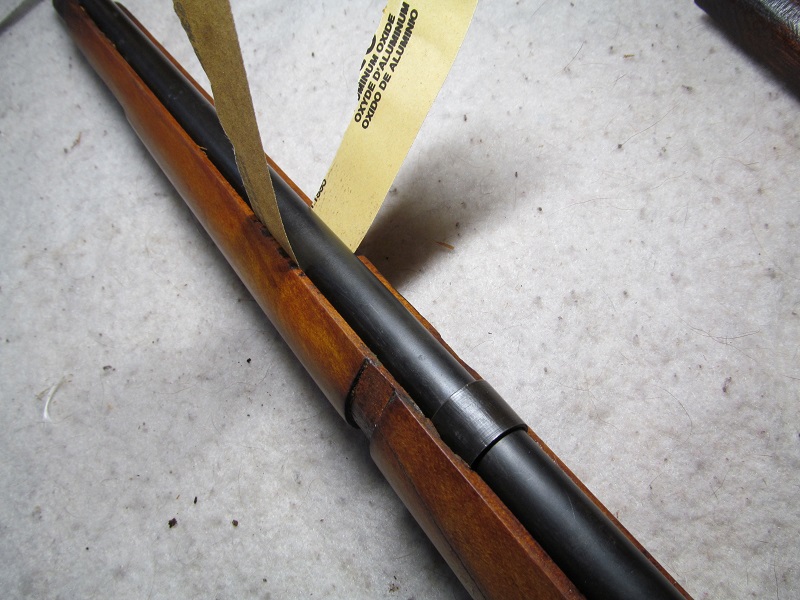 Right then, almost done. I now checked the top wood for interference, and luckily for me, there was plenty of room around the barrel. Only one problem remained. the bayonet lug. After having realigned the center of the fore-stock, the bayonet lug did not clear the end of the barrel. I relieved the metal and filed the wood at the nose of the fore-stock until the lug fit correctly. Part C: conclusion Finally, the job was done. From this point I was able to experiment with shims and such to tighten my shot groups even more. I won't go into detail about that, it's been covered many times before by people much smarter than myself. Once the fore-stock was correctly fitted, any of the common methods of barrel stabilizing can be used, at that point it's just another normal Enfield. A simple fix, one that I overlooked for a long time. A simple solution that only takes a bit of time and the cost of some Probed epoxy and I resolved another area of the Ishapore Enfield that suffered from poor quality control at the factory. Oh yes, I almost forgot! You want to know how it shot of course? Excellent! My shot groups went immediately from full back board spread to within 8 inches. At last, a shot group I could work with! Now if only the shot group was where I pointed the rifle, but, as they say, that's a story for another time. ------------- Politicians aren't born. They are excreted |
Replies:
Posted By: A square 10
Date Posted: January 26 2014 at 11:18am
| thanks - it always helps to know others have the same issues we all do , but its nice to know there are choices in how to deal with them , i appreciate your expose' |
Posted By: Jon287
Date Posted: January 26 2014 at 10:16pm
|
Nice job. I guess I have more work to do on my Long branch than I realized. Thanks for posting this. ------------- Now is the time for all good men to come to the aid of their planet!! |
Posted By: Shamu
Date Posted: January 27 2014 at 12:52am
Nice detailed post & a great job. ------------- Don't shoot till you see the whites of their thighs. (Unofficial motto of the Royal Air Force) |
Posted By: Bear43
Date Posted: January 27 2014 at 1:26am
| The quality of Indian fore-ends can sometimes leave a lot to desire. I have one in my closet right now that is even worse than that. I bought it NOS, still wrapped in paper, and it not only bows to the left like that but is also twisted. Makes me shake my head when trying to think of how that could ever be properly fitted. |
Posted By: ozzlefinch
Date Posted: January 27 2014 at 5:27am
|
Meh, I've written better stuff. Looking back over this post I found a number of things that could have been done better, but I won't point them out ;) I wouldn't even know where to begin with a fore-stock that was twisted AND bent. It sounds like it the wood was cut wet, then put in storage where it dried and warped. If it were installed on a rifle, then it would have been held in some kind of form until it dried and pressured the barrel, as mine did. With a stock as bad as yours, the only thing that I think can be done is to boil the wood until it softens (could take hours or even days) and then clamp it into a jig of some type to hold it's shape for 6 months or a year until it dried. Maybe some other way to do it, but I'm not a wood working expert. Probably best to buy a used one, it might be better (if you can find it). ------------- Politicians aren't born. They are excreted |