Refinishing the cocking piece face |
Post Reply 
|
| Author | |
Zed 
Special Member 

Donating Member Joined: May 01 2012 Location: France Status: Offline Points: 6460 |
 Post Options Post Options
") Thanks(0) Thanks(0)
 Quote Reply Quote Reply
 Topic: Refinishing the cocking piece face Topic: Refinishing the cocking piece facePosted: March 29 2016 at 11:54am |
|
Having a bit of a sleepless night on Saturday, I lay in bed about 4am and worked out a way of tidying up the cocking piece face without worrying about going off square.
I got time to get into the shed and made this system. Basically a slotted piece of wood to hold the polishing stone; just below the surface. It is blocked from sliding backwards by slot and small cross piece (not visisble here)  A second piece slotted to the width of the cocking piece , a tight fit is best. In the slot is a screw to adjust the angle of the cocking piece 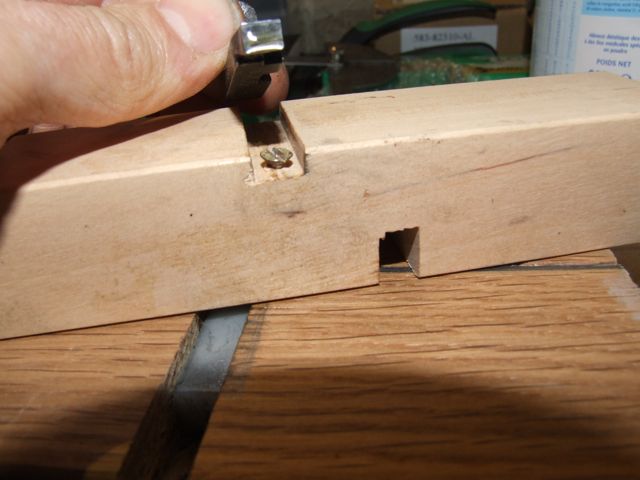 When you've set the angle (5° on this unused but unpolished piece). Gently polish back and forth; regularly oiling the stone. In this case it's an Arkansas stone, square section.  The end result is good; with no off square edges. Doing it only by hand would require hours of practice and probably a bucket full of parts!
|
|
|
It's nice to be important, but it's more important to be nice!
|
|
 |
|
|
Canuck
Special Member

Donating Member Joined: January 17 2012 Location: Cochrane, AB Status: Offline Points: 4021 |
Post Options
Thanks(0)
Quote Reply
Posted: March 29 2016 at 12:14pm |
|
Terrific idea, Zed!
|
|
|
Castles made of sand slip into the sea.....eventually
|
|
|
|
|
Shamu
Admin Group

Logo Designer / Donating Member Joined: April 25 2007 Location: MD, USA. Status: Offline Points: 20510 |
Post Options
Thanks(0)
Quote Reply
Posted: March 29 2016 at 1:35pm |
|
Great idea, but are you re-hardening it?
IIRC they are only case-hardened & its really easy to break through the surface. |
|
|
Don't shoot till you see the whites of their thighs. (Unofficial motto of the Royal Air Force)
|
|
|
|
|
Zed
Special Member
Donating Member Joined: May 01 2012 Location: France Status: Offline Points: 6460 |
Post Options
Thanks(0)
Quote Reply
Posted: March 29 2016 at 2:16pm |
|
If the original has worn a groove then chances are it's worn through the hardening anyway; so may need re-treating.
I don't know what is the correct method; so will look into that. However, for the amount we shoot these; I'm not sure that it's essential
|
|
|
It's nice to be important, but it's more important to be nice!
|
|
|
|
|
hoadie
Moderator Group

Joined: March 16 2006 Location: Niagara/Canada Status: Offline Points: 9680 |
Post Options
Thanks(0)
Quote Reply
Posted: March 29 2016 at 3:08pm |
|
WOW! C'est une assez bonne idee, Zed!
 Vous etes vraiment plein de belles idees et improvation Vous etes vraiment plein de belles idees et improvation
|
|
|
Loose wimmen tightened here
|
|
|
|
|
hoadie
Moderator Group
Joined: March 16 2006 Location: Niagara/Canada Status: Offline Points: 9680 |
Post Options
Thanks(0)
Quote Reply
Posted: March 29 2016 at 3:09pm |
|
..I learn a boatload of stuff from you.
|
|
|
Loose wimmen tightened here
|
|
|
|
|
Shamu
Admin Group
Logo Designer / Donating Member Joined: April 25 2007 Location: MD, USA. Status: Offline Points: 20510 |
Post Options
Thanks(0)
Quote Reply
Posted: March 30 2016 at 7:38am |
|
Yes it probably was. A popular mod was to regrind the face at a slight angle to lighten the trigger. Unfortunately many who did so went right through the case hardening & as you say a groove developed. Its just "Kasenit" & heat IIRC.
|
|
|
Don't shoot till you see the whites of their thighs. (Unofficial motto of the Royal Air Force)
|
|
|
|
|
Tony
Moderator Group

Moderator Joined: April 18 2006 Location: United Kingdom Status: Offline Points: 3256 |
Post Options
Thanks(0)
Quote Reply
Posted: March 30 2016 at 8:34am |
|
If you have a local blacksmith he could probably case harden it for you quite easily, I did some case hardening when I was at school (Socratese wasn't amused) in the forge.For the life of me I can't remember what the powder was called but it worked ok.
|
|
|
Rottie (PitBulls dad.)
“If electricity comes from electrons, does morality come from morons Born free taxed to death!!! |
|
|
|
|
Zed
Special Member
Donating Member Joined: May 01 2012 Location: France Status: Offline Points: 6460 |
Post Options
Thanks(0)
Quote Reply
Posted: March 30 2016 at 11:54am |
|
I can remember hardening and tempering steel at school; (how old am I) we just used to heat until cherry red, quench (in oil to blacken as well) or water; then clean up the piece and heat with a torch to get the tempering colour required.
During my apprenticeship you could get almost anything made on the side if you knew who to ask. I have all this info somewhere in books that are in some box, I'll have to dig them out. There seems to be little time spent on proper craft's in school's these days; which is a shame.
|
|
|
It's nice to be important, but it's more important to be nice!
|
|
|
|
|
Shamu
Admin Group
Logo Designer / Donating Member Joined: April 25 2007 Location: MD, USA. Status: Offline Points: 20510 |
Post Options
Thanks(0)
Quote Reply
Posted: March 30 2016 at 1:24pm |
|
There are several powders you can use, basically you heat to cherry red & drop in the powder, covering & leaving to cool. It bonds & reacts with the steels to make a bonded, hardened surface layer.
http://www.midwayusa.com/Product/119479/cherry-red-surface-hardening-compound-1-lb This is a common case hardening compound for all industries you might find also: "Kasenit" |
|
|
Don't shoot till you see the whites of their thighs. (Unofficial motto of the Royal Air Force)
|
|
|
|
|
Zed
Special Member
Donating Member Joined: May 01 2012 Location: France Status: Offline Points: 6460 |
Post Options
Thanks(0)
Quote Reply
Posted: March 30 2016 at 1:33pm |
|
I posted a question regarding the hardening of the cocking piece at the Milsurp's forum. Their resident expert has replied that the whole piece is hardened, not just the surface. So it should be ok.
|
|
|
It's nice to be important, but it's more important to be nice!
|
|
|
|
|
Shamu
Admin Group
Logo Designer / Donating Member Joined: April 25 2007 Location: MD, USA. Status: Offline Points: 20510 |
Post Options
Thanks(0)
Quote Reply
Posted: March 31 2016 at 8:05am |
|
Interesting, that's exactly the opposite to what I've heard from multiple sources over several decades in at least 2 countries.
Not necessarily saying he's wrong, but with the internet I always double triple check. |
|
|
Don't shoot till you see the whites of their thighs. (Unofficial motto of the Royal Air Force)
|
|
|
|
|
Zed
Special Member
Donating Member Joined: May 01 2012 Location: France Status: Offline Points: 6460 |
Post Options
Thanks(0)
Quote Reply
Posted: March 31 2016 at 10:28am |
|
Another post suggests that while the complete part is hardened to some degree, the face is harder than the rest. I think that in view of the number of years production and the number of factories, there must be some variation in standards.
As we are only polishing to get the best trigger operation, I don't think it will be too much of an issue. The sear wears a groove in the face of the cocking piece, so the sear must be harder.
|
|
|
It's nice to be important, but it's more important to be nice!
|
|
|
|
|
Shamu
Admin Group
Logo Designer / Donating Member Joined: April 25 2007 Location: MD, USA. Status: Offline Points: 20510 |
Post Options
Thanks(0)
Quote Reply
Posted: March 31 2016 at 1:10pm |
|
I usually put a little dab of grease on the front face. It makes a huge difference! I use one of those embedding graphite types so my sear tip & cocking piece front face (bent) are probably slicker than eel snot currently!
|
|
|
Don't shoot till you see the whites of their thighs. (Unofficial motto of the Royal Air Force)
|
|
|
|
|
Post Reply
|
|
| Tweet |
| Forum Jump | Forum Permissions You cannot post new topics in this forum You cannot reply to topics in this forum You cannot delete your posts in this forum You cannot edit your posts in this forum You cannot create polls in this forum You cannot vote in polls in this forum |


 Topic Options